Chapter 3. LVM (Logical Volume Manager)
LVM is a tool for logical volume management which includes allocating disks, striping, mirroring and resizing logical volumes.
With LVM, a hard drive or set of hard drives is allocated to one or more physical volumes. LVM physical volumes can be placed on other block devices which might span two or more disks.
The physical volumes are combined into logical volumes, with the exception of the /boot/ partition. The /boot/ partition cannot be on a logical volume group because the boot loader cannot read it. If the root (/) partition is on a logical volume, create a separate /boot/ partition which is not a part of a volume group.
Since a physical volume cannot span over multiple drives, to span over
more than one drive, create one or more physical volumes per drive.
The volume groups can be divided into logical volumes, which are assigned mount points, such as /home and /
and file system types, such as ext2 or ext3. When "partitions" reach
their full capacity, free space from the volume group can be added to
the logical volume to increase the size of the partition. When a new
hard drive is added to the system, it can be added to the volume group,
and partitions that are logical volumes can be increased in size.
On the other hand, if a system is partitioned with the ext3 file
system, the hard drive is divided into partitions of defined sizes. If a
partition becomes full, it is not easy to expand the size of the
partition. Even if the partition is moved to another hard drive, the
original hard drive space has to be reallocated as a different partition
or not used.
This chapter on LVM/LVM2 focuses on the use of the LVM GUI administration tool, i.e. system-config-lvm.
For comprehensive information on the creation and configuration of LVM
partitions in clustered and non-clustered storage, please refer to the Logical Volume Manager Administration guide also provided by Red Hat.
In addition, the Installation Guide for
Red Hat Enterprise Linux 6 also documents how to create and configure
LVM logical volumes during installation. For more information, refer to
the Create LVM Logical Volume section of the Installation Guide for Red Hat Enterprise Linux 6.
LVM version 2, or LVM2, was the default for Red Hat Enterprise Linux
5, which uses the device mapper driver contained in the 2.6 kernel. LVM2
can be upgraded from versions of Red Hat Enterprise Linux running the
2.4 kernel.
3.2. Using system-config-lvm
The LVM utility allows you to manage logical volumes within X windows
or graphically. You can access the application by selecting from your
menu panel > > . Alternatively you can start the Logical Volume Management utility by typing system-config-lvm from a terminal.
In the example used in this section, the following are the details
for the volume group that was created during the installation:
/boot - (Ext3) file system. Displayed under 'Uninitialized Entities'. (DO NOT initialize this partition).
LogVol00 - (LVM) contains the (/) directory (312 extents).
LogVol02 - (LVM) contains the (/home) directory (128 extents).
LogVol03 - (LVM) swap (28 extents).
The logical volumes above were created in disk entity
/dev/hda2 while
/boot was created in
/dev/hda1. The system also consists of 'Uninitialised Entities' which are illustrated in
Figure 3.7, “Uninitialized Entities”.
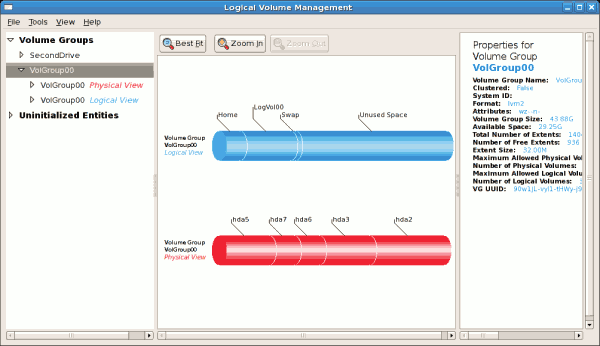
The figure below illustrates the main window in the LVM utility. The
logical and the physical views of the above configuration are
illustrated below. The three logical volumes exist on the same physical
volume (hda2).
Figure 3.3. Main LVM Window
The figure below illustrates the physical view for the volume. In
this window, you can select and remove a volume from the volume group or
migrate extents from the volume to another volume group. Steps to
migrate extents are discussed in
Figure 3.12, “Migrate Extents”.
Figure 3.4. Physical View Window
The figure below illustrates the logical view for the selected volume
group. The logical volume size is also indicated with the individual
logical volume sizes illustrated.
Figure 3.5. Logical View Window
On the left side column, you can select the individual logical
volumes in the volume group to view more details about each. In this
example the objective is to rename the logical volume name for
'LogVol03' to 'Swap'. To perform this operation select the respective
logical volume and click on the Edit Properties
button. This will display the Edit Logical Volume window from which you
can modify the Logical volume name, size (in extents) and also use the
remaining space available in a logical volume group. The figure below
illustrates this.
Please note that this logical volume cannot be changed in size as
there is currently no free space in the volume group. If there was
remaining space, this option would be enabled (see
Figure 3.21, “Edit logical volume”). Click on the
OK button to save your changes (this will remount the volume). To cancel your changes click on the
Cancel button. To revert to the last snapshot settings click on the
Revert button. A snapshot can be created by clicking on the
Create Snapshot button on the LVM utility window. If the selected logical volume is in use by the system (for example) the
/ (root) directory, this task will not be successful as the volume cannot be unmounted.
Figure 3.6. Edit Logical Volume
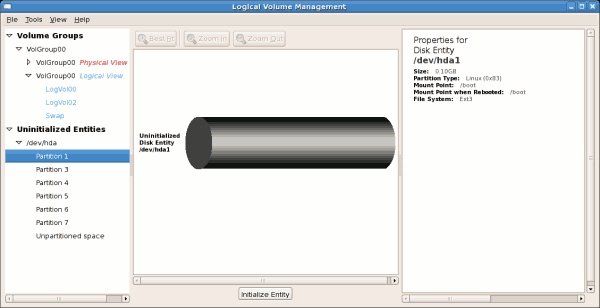
3.2.1. Utilizing Uninitialized Entities
'Uninitialized Entities' consist of unpartitioned space and non LVM
file systems. In this example partitions 3, 4, 5, 6 and 7 were created
during installation and some unpartitioned space was left on the hard
disk. Please view each partition and ensure that you read the
'Properties for Disk Entity' on the right column of the window to ensure
that you do not delete critical data. In this example partition 1
cannot be initialized as it is /boot. Uninitialized entities are illustrated below.
Figure 3.7. Uninitialized Entities
In this example, partition 3 will be initialized and added to an
existing volume group. To initialize a partition or unpartioned space,
select the partition and click on the Initialize Entity button. Once initialized, a volume will be listed in the 'Unallocated Volumes' list.
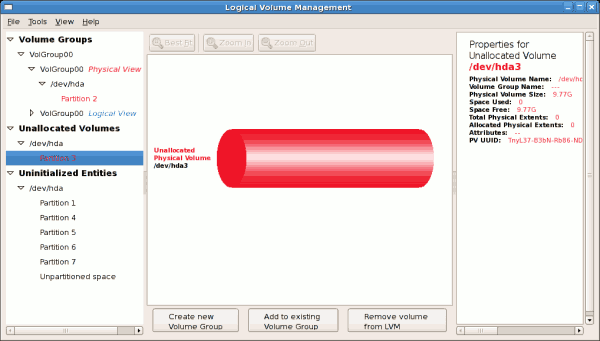
3.2.2. Adding Unallocated Volumes to a Volume Group
Once initialized, a volume will be listed in the 'Unallocated
Volumes' list. The figure below illustrates an unallocated partition
(Partition 3). The respective buttons at the bottom of the window allow
you to:
create a new volume group,
add the unallocated volume to an existing volume group,
remove the volume from LVM.
To add the volume to an existing volume group, click on the
Add to Existing Volume Group button.
Figure 3.8. Unallocated Volumes
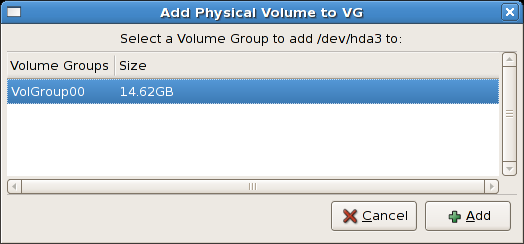
Clicking on the Add to Existing Volume Group
button will display a pop up window listing the existing volume groups
to which you can add the physical volume you are about to initialize. A
volume group may span across one or more hard disks. In this example
only one volume group exists as illustrated below.
Figure 3.9. Add physical volume to volume group
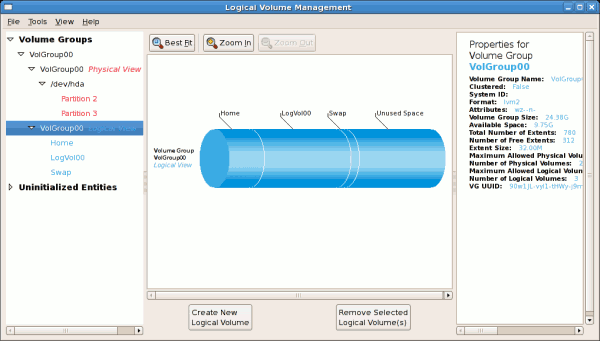
Once added to an existing volume group the new logical volume is
automatically added to the unused space of the selected volume group.
You can use the unused space to:
create a new logical volume (click on the Create New Logical Volume(s) button,
select an existing logical volume and remove it from the volume group by clicking on the Remove Selected Logical Volume(s) button. Please note that you cannot select unused space to perform this operation.
The figure below illustrates the logical view of 'VolGroup00' after adding the new volume group.
Figure 3.10. Logical view of volume group
In the figure below, the uninitialized entities (partitions 3, 5, 6 and 7) were added to 'VolGroup00'.
Figure 3.11. Logical view of volume group
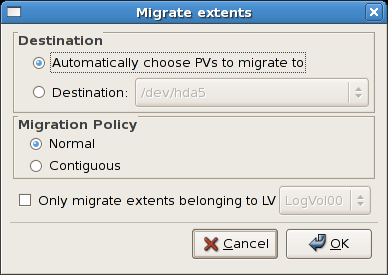
To migrate extents from a physical volume, select the volume and click on the
Migrate Selected Extent(s) From Volume
button. Please note that you need to have a sufficient number of free
extents to migrate extents within a volume group. An error message will
be displayed if you do not have a sufficient number of free extents. To
resolve this problem, please extend your volume group (see
Section 3.2.6, “Extending a Volume Group”).
If a sufficient number of free extents is detected in the volume group,
a pop up window will be displayed from which you can select the
destination for the extents or automatically let LVM choose the physical
volumes (PVs) to migrate them to. This is illustrated below.
Figure 3.12. Migrate Extents
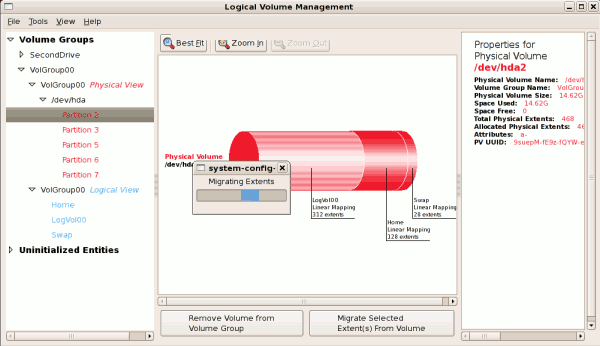
The figure below illustrates a migration of extents in progress. In
this example, the extents were migrated to 'Partition 3'.
Figure 3.13. Migrating extents in progress
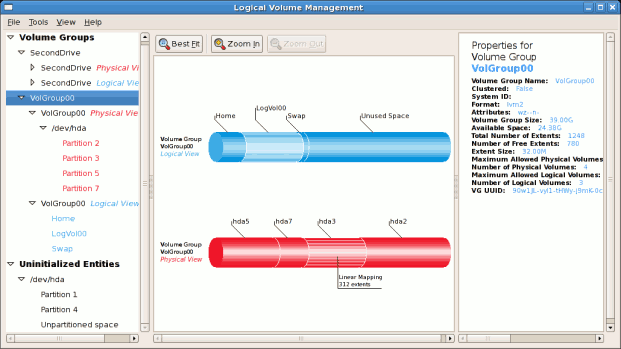
Once the extents have been migrated, unused space is left on the
physical volume. The figure below illustrates the physical and logical
view for the volume group. Please note that the extents of LogVol00
which were initially in hda2 are now in hda3. Migrating extents allows
you to move logical volumes in case of hard disk upgrades or to manage
your disk space better.
Figure 3.14. Logical and physical view of volume group
3.2.4. Adding a New Hard Disk Using LVM
In this example, a new IDE hard disk was added. The figure below
illustrates the details for the new hard disk. From the figure below,
the disk is uninitialized and not mounted. To initialize a partition,
click on the
Initialize Entity button. For more details, see
Section 3.2.1, “Utilizing Uninitialized Entities”. Once initialized, LVM will add the new volume to the list of unallocated volumes as illustrated in
Figure 3.16, “Create new volume group”.
Figure 3.15. Uninitialized hard disk
3.2.5. Adding a New Volume Group
Once initialized, LVM will add the new volume to the list of
unallocated volumes where you can add it to an existing volume group or
create a new volume group. You can also remove the volume from LVM. The
volume if removed from LVM will be listed in the list of 'Uninitialized
Entities' as illustrated in
Figure 3.15, “Uninitialized hard disk”. In this example, a new volume group was created as illustrated below.
Figure 3.16. Create new volume group
Once created a new volume group will be displayed in the list of
existing volume groups as illustrated below. The logical view will
display the new volume group with unused space as no logical volumes
have been created. To create a logical volume, select the volume group
and click on the Create New Logical Volume
button as illustrated below. Please select the extents you wish to use
on the volume group. In this example, all the extents in the volume
group were used to create the new logical volume.
Figure 3.17. Create new logical volume
The figure below illustrates the physical view of the new volume
group. The new logical volume named 'Backups' in this volume group is
also listed.
Figure 3.18. Physical view of new volume group
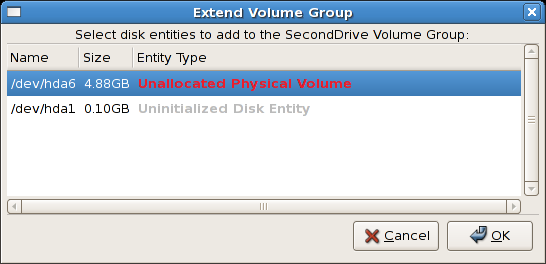
3.2.6. Extending a Volume Group
In this example, the objective was to extend the new volume group to
include an uninitialized entity (partition). This was to increase the
size or number of extents for the volume group. To extend the volume
group, click on the
Extend Volume Group
button. This will display the 'Extend Volume Group' window as
illustrated below. On the 'Extend Volume Group' window, you can select
disk entities (partitions) to add to the volume group. Please ensure
that you check the contents of any 'Uninitialized Disk Entities'
(partitions) to avoid deleting any critical data (see
Figure 3.15, “Uninitialized hard disk”). In the example, the disk entity (partition)
/dev/hda6 was selected as illustrated below.
Figure 3.19. Select disk entities
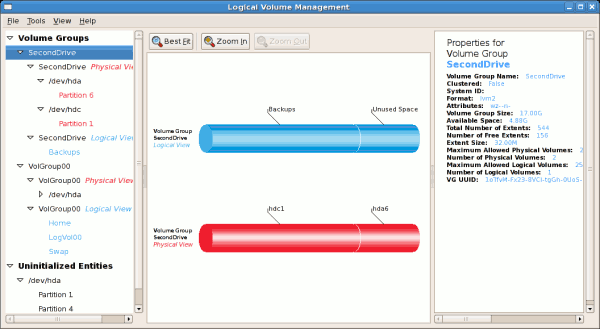
Once added, the new volume will be added as 'Unused Space' in the
volume group. The figure below illustrates the logical and physical view
of the volume group after it was extended.
Figure 3.20. Logical and physical view of an extended volume group
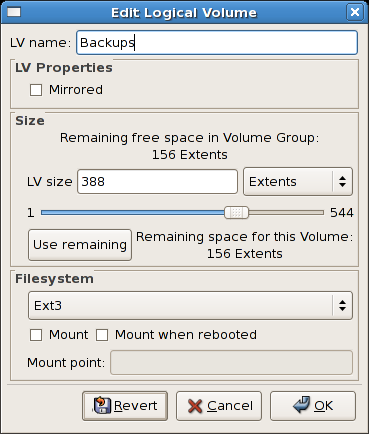
3.2.7. Editing a Logical Volume
The LVM utility allows you to select a logical volume in the volume
group and modify its name, size and specify file system options. In this
example, the logical volume named 'Backups" was extended onto the
remaining space for the volume group.
Clicking on the Edit Properties
button will display the 'Edit Logical Volume' popup window from which
you can edit the properties of the logical volume. On this window, you
can also mount the volume after making the changes and mount it when the
system is rebooted. Please note that you should indicate the mount
point. If the mount point you specify does not exist, a popup window
will be displayed prompting you to create it. The 'Edit Logical Volume'
window is illustrated below.
Figure 3.21. Edit logical volume
If you wish to mount the volume, select the 'Mount' checkbox
indicating the preferred mount point. To mount the volume when the
system is rebooted, select the 'Mount when rebooted' checkbox. In this
example, the new volume will be mounted in /mnt/backups. This is illustrated in the figure below.
Figure 3.22. Edit logical volume - specifying mount options
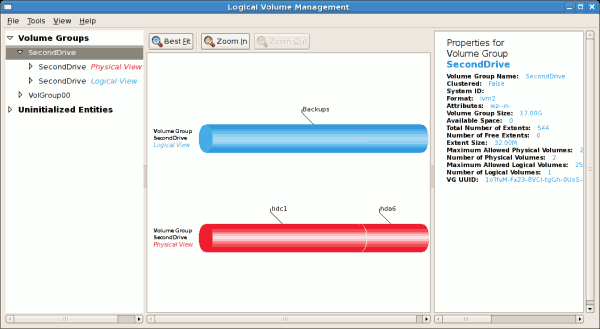
The figure below illustrates the logical and physical view of the
volume group after the logical volume was extended to the unused space.
Please note in this example that the logical volume named 'Backups'
spans across two hard disks. A volume can be stripped across two or more
physical devices using LVM.
Figure 3.23. Edit logical volume
Use these sources to learn more about LVM.
rpm -qd lvm2 — This command shows all the documentation available from the lvm package, including man pages.
lvm help — This command shows all LVM commands available.
The utility
parted allows users to:
View the existing partition table
Change the size of existing partitions
Add partitions from free space or additional hard drives
By default, the parted package is included when installing Red Hat Enterprise Linux. To start parted, log in as root and type the command parted /dev/sda at a shell prompt (where /dev/sda
If you want to remove or resize a partition, the device on which that
partition resides must not be in use. Creating a new partition on a
device which is in use—while possible—is not recommended.
For a device to not be in use, none of the partitions on the device
can be mounted, and any swap space on the device must not be enabled.
As well, the partition table should not be modified while it is in use
because the kernel may not properly recognize the changes. If the
partition table does not match the actual state of the mounted
partitions, information could be written to the wrong partition,
resulting in lost and overwritten data.
The easiest way to achieve this it to boot your system in rescue mode. When prompted to mount the file system, select Skip.
Alternately, if the drive does not contain any partitions in use
(system processes that use or lock the file system from being
unmounted), you can unmount them with the umount command and turn off all the swap space on the hard drive with the swapoff command.
Table 4.1, “parted commands” contains a list of commonly used
parted commands. The sections that follow explain some of these commands and arguments in more detail.
Table 4.1. parted commands
|
Command
|
Description
|
|---|
check minor-num
|
Perform a simple check of the file system
|
cp from to
|
Copy file system from one partition to another; from and to are the minor numbers of the partitions
|
help
|
Display list of available commands
|
mklabel label
|
Create a disk label for the partition table
|
mkfs minor-num file-system-type
|
Create a file system of type file-system-type
|
mkpart part-type fs-type start-mb end-mb
|
Make a partition without creating a new file system
|
mkpartfs part-type fs-type start-mb end-mb
|
Make a partition and create the specified file system
|
move minor-num start-mb end-mb
|
Move the partition
|
name minor-num name
|
Name the partition for Mac and PC98 disklabels only
|
print
|
Display the partition table
|
quit
|
Quit parted
|
rescue start-mb end-mb
|
Rescue a lost partition from start-mb to end-mb
|
resize minor-num start-mb end-mb
|
Resize the partition from start-mb to end-mb
|
rm minor-num
|
Remove the partition
|
select device
|
Select a different device to configure
|
set minor-num flag state
|
Set the flag on a partition; state is either on or off
|
toggle [NUMBER [FLAG]
|
Toggle the state of FLAG on partition NUMBER
|
unit UNIT
|
Set the default unit to UNIT
|
4.1. Viewing the Partition Table
After starting parted, use the command print to view the partition table. A table similar to the following appears:
Model: ATA ST3160812AS (scsi)
Disk /dev/sda: 160GB
Sector size (logical/physical): 512B/512B
Partition Table: msdos

Number  Start   End    Size    Type      File system  Flags
 1      32.3kB  107MB  107MB   primary   ext3         boot
 2      107MB   105GB  105GB   primary   ext3
 3      105GB   107GB  2147MB  primary   linux-swap
 4      107GB   160GB  52.9GB  extended		      root
 5      107GB   133GB  26.2GB  logical   ext3
 6      133GB   133GB  107MB   logical   ext3
 7      133GB   160GB  26.6GB  logical                lvm
The first line contains the disk type, manufacturer, model number and
interface, and the second line displays the disk label type. The
remaining output below the fourth line shows the partition table.
In the partition table, the Minor number is the partition number. For example, the partition with minor number 1 corresponds to /dev/sda1. The Start and End values are in megabytes. Valid Type are metadata, free, primary, extended, or logical. The Filesystem is the file system type, which can be any of the following:
ext2
ext3
fat16
fat32
hfs
jfs
linux-swap
ntfs
reiserfs
hp-ufs
sun-ufs
xfs
If a Filesystem of a device shows no value, this means that its file system type is unknown.
The Flags column lists the flags set for the partition. Available flags are boot, root, swap, hidden, raid, lvm, or lba.
To select a different device without having to restart parted, use the select command followed by the device name (for example, /dev/sda). Doing so allows you to view or configure the partition table of a device.
4.2. Creating a Partition
Do not attempt to create a partition on a device that is in use.
Before creating a partition, boot into rescue mode (or unmount any
partitions on the device and turn off any swap space on the device).
Start parted, where /dev/sda is the device on which to create the partition:
parted /dev/sda
View the current partition table to determine if there is enough free space:
print
4.2.1. Making the Partition
From the partition table, determine the start and end points of the
new partition and what partition type it should be. You can only have
four primary partitions (with no extended partition) on a device. If you
need more than four partitions, you can have three primary partitions,
one extended partition, and multiple logical partitions within the
extended. For an overview of disk partitions, refer to the appendix An Introduction to Disk Partitions in the Red Hat Enterprise Linux 6 Installation Guide.
For example, to create a primary partition with an ext3 file system
from 1024 megabytes until 2048 megabytes on a hard drive type the
following command:
mkpart primary ext3 1024 2048
If you use the mkpartfs command instead, the file system is created after the partition is created. However, parted does not support creating an ext3 file system. Thus, if you wish to create an ext3 file system, use mkpart and create the file system with the mkfs command as described later.
The changes start taking place as soon as you press Enter, so review the command before executing to it.
After creating the partition, use the print
command to confirm that it is in the partition table with the correct
partition type, file system type, and size. Also remember the minor
number of the new partition so that you can label any file systems on
it. You should also view the output of cat /proc/partitions to make sure the kernel recognizes the new partition.
4.2.2. Formatting and Labeling the Partition
The partition still does not have a file system. Create the file system:
/sbin/mkfs -t ext3 /dev/sda6
Formatting the partition permanently destroys any data that currently exists on the partition.
Next, give the file system on the partition a label. For example, if the file system on the new partition is /dev/sda6 and you want to label it /work, use:
e2label /dev/sda6 /work
By default, the installation program uses the mount point of the
partition as the label to make sure the label is unique. You can use any
label you want.
Afterwards, create a mount point (e.g. /work) as root.
As root, edit the /etc/fstab file to include the new partition using the partition's UUID. Use the blkid -L label command to retrieve the partition's UUID. The new line should look similar to the following:
UUID=93a0429d-0318-45c0-8320-9676ebf1ca79 /work ext3 defaults 1 2
The first column should contain UUID=
followed by the file system's UUID. The second column should contain
the mount point for the new partition, and the next column should be the
file system type (for example, ext3 or swap). If you need more
information about the format, read the man page with the command man fstab.
If the fourth column is the word defaults, the partition is mounted at boot time. To mount the partition without rebooting, as root, type the command:
mount /work
4.3. Removing a Partition
Do not attempt to remove a partition on a device that is in use.
Before removing a partition, boot into rescue mode (or unmount any
partitions on the device and turn off any swap space on the device).
Start parted, where /dev/sda is the device on which to remove the partition:
parted /dev/sda
View the current partition table to determine the minor number of the partition to remove:
print
Remove the partition with the command rm. For example, to remove the partition with minor number 3:
rm 3
The changes start taking place as soon as you press Enter, so review the command before committing to it.
After removing the partition, use the print command to confirm that it is removed from the partition table. You should also view the output of
cat /proc/partitions
to make sure the kernel knows the partition is removed.
The last step is to remove it from the /etc/fstab file. Find the line that declares the removed partition, and remove it from the file.
4.4. Resizing a Partition
Do not attempt to resize a partition on a device that is in use.
Before resizing a partition, boot into rescue mode (or unmount any
partitions on the device and turn off any swap space on the device).
Start parted, where /dev/sda is the device on which to resize the partition:
parted /dev/sda
View the current partition table to determine the minor number of the
partition to resize as well as the start and end points for the
partition:
print
To resize the partition, use the resize
command followed by the minor number for the partition, the starting
place in megabytes, and the end place in megabytes. For example:
resize 3 1024 2048
A partition cannot be made larger than the space available on the device
After resizing the partition, use the print
command to confirm that the partition has been resized correctly, is
the correct partition type, and is the correct file system type.
After rebooting the system into normal mode, use the command df to make sure the partition was mounted and is recognized with the new size.
Chapter 6. The Ext3 File System
The ext3 file system is essentially an enhanced version of the ext2
file system. These improvements provide the following advantages:
- Availability
After an unexpected power failure or system crash (also called an unclean system shutdown), each mounted ext2 file system on the machine must be checked for consistency by the e2fsck
program. This is a time-consuming process that can delay system boot
time significantly, especially with large volumes containing a large
number of files. During this time, any data on the volumes is
unreachable.
The journaling provided by the ext3 file system means that this
sort of file system check is no longer necessary after an unclean system
shutdown. The only time a consistency check occurs using ext3 is in
certain rare hardware failure cases, such as hard drive failures. The
time to recover an ext3 file system after an unclean system shutdown
does not depend on the size of the file system or the number of files;
rather, it depends on the size of the journal used to maintain consistency. The default journal size takes about a second to recover, depending on the speed of the hardware.
The only supported journaling mode in ext3 is data=ordered (default).
- Data Integrity
The ext3 file system prevents loss of data integrity in the event
that an unclean system shutdown occurs. The ext3 file system allows you
to choose the type and level of protection that your data receives. By
default, the ext3 volumes are configured to keep a high level of data
consistency with regard to the state of the file system.
- Speed
Despite writing some data more than once, ext3 has a higher
throughput in most cases than ext2 because ext3's journaling optimizes
hard drive head motion. You can choose from three journaling modes to
optimize speed, but doing so means trade-offs in regards to data
integrity if the system was to fail.
- Easy Transition
The Red Hat Enterprise Linux 6 version of ext3 features the following updates:
The default size of the on-disk inode has increased for more
efficient storage of extended attributes, for example ACLs or SELinux
attributes. Along with this change, the default number of inodes created
on a file system of a given size has been decreased. The inode size may
be selected with the mke2fs -I option, or specified in /etc/mke2fs.conf to set system-wide defaults for mke2fs.
If you upgrade to Red Hat Enterprise Linux 6 with the intention of
keeping any ext3 file systems intact, you do not need to remake the file
system.
A new mount option has been added: data_err=abort. This option instructs ext3 to abort the journal if an error occurs in a file data (as opposed to metadata) buffer in data=ordered mode. This option is disabled by default (i.e. set as data_err=ignore).
When creating a file system (i.e. mkfs), mke2fs
will attempt to "discard" or "trim" blocks not used by the file system
metadata. This helps to optimize SSDs or thinly-provisioned storage. To
suppress this behavior, use the mke2fs -K option.
6.1. Creating an Ext3 File System
After installation, it is sometimes necessary to create a new ext3
file system. For example, if you add a new disk drive to the system, you
may want to partition the drive and use the ext3 file system.
The steps for creating an ext3 file system are as follows:
Format the partition with the ext3 file system using mkfs.
Label the file system using e2label.
6.2. Converting to an Ext3 File System
The tune2fs allows you to convert an ext2 file system to ext3.
Always use the e2fsck utility to check your file system before and after using tune2fs.
A default installation of Red Hat Enterprise Linux uses ext4 for all
file systems. Before trying to convert, back up all your file systems in
case any errors occur.
In addition, Red Hat recommends that you should, whenever possible,
create a new ext3 file system and migrate your data to it instead of
converting from ext2 to ext3.
To convert an ext2 file system to ext3, log in as root and type the following command in a terminal:
tune2fs -j block_device
where block_device contains the ext2 file system you wish to convert.
A valid block device could be one of two types of entries:
A mapped device — A logical volume in a volume group, for example, /dev/mapper/VolGroup00-LogVol02.
A static device — A traditional storage volume, for example, /dev/sdbX, where sdb is a storage device name and X is the partition number.
Issue the df command to display mounted file systems.
6.3. Reverting to an Ext2 File System
For simplicity, the sample commands in this section use the following value for the block device:
/dev/mapper/VolGroup00-LogVol02
If you wish to revert a partition from ext3 to ext2 for any reason,
you must first unmount the partition by logging in as root and typing,
umount /dev/mapper/VolGroup00-LogVol02
Next, change the file system type to ext2 by typing the following command as root:
tune2fs -O ^has_journal /dev/mapper/VolGroup00-LogVol02
Check the partition for errors by typing the following command as root:
e2fsck -y /dev/mapper/VolGroup00-LogVol02
Then mount the partition again as ext2 file system by typing:
mount -t ext2 /dev/mapper/VolGroup00-LogVol02 /mount/point
In the above command, replace /mount/point with the mount point of the partition.
If a .journal file exists at the root level of the partition, delete it.
You now have an ext2 partition.
If you want to permanently change the partition to ext2, remember to update the /etc/fstab file.
Chapter 7.
The Ext4 File System
The ext4 file system is a scalable extension of the ext3 file system,
which was the default file system of Red Hat Enterprise Linux 5. Ext4 is
now the default file system of Red Hat Enterprise Linux 6, and can
support files and file systems of up to 16 terabytes in size. It also
supports an unlimited number of sub-directories (the ext3 file system
only supports up to 32,000).
- Main Features
Ext4 uses extents (as opposed to the traditional block mapping
scheme used by ext2 and ext3), which improves performance when using
large files and reduces metadata overhead for large files. In addition,
ext4 also labels unallocated block groups and inode table sections
accordingly, which allows them to be skipped during a file system check.
This makes for quicker file system checks, which becomes more
beneficial as the file system grows in size.
- Allocation Features
The ext4 file system features the following allocation schemes:
Because of delayed allocation and other performance optimizations,
ext4's behavior of writing files to disk is different from ext3. In
ext4, a program's writes to the file system are not guaranteed to be
on-disk unless the program issues an fsync() call afterwards.
By default, ext3 automatically forces newly created files to disk almost immediately even without fsync(). This behavior hid bugs in programs that did not use fsync()
to to ensure that written data was on-disk. The ext4 file system, on
the other hand, often waits several seconds to write out changes to
disk, allowing it to combine and reorder writes for better disk
performance than ext3
Unlike ext3, the ext4 file system does not force data to disk on
transaction commit. As such, it takes longer for buffered writes to be
flushed to disk. As with any file system, use data integrity calls such
as fsync() to ensure that data is written to permanent storage.
- Other Ext4 Features
The Ext4 file system also supports the following:
Extended attributes (xattr), which allows the system to associate several additional name/value pairs per file.
Quota journaling, which avoids the need for lengthy quota consistency checks after a crash.
The only supported journaling mode in ext4 is data=ordered (default).
Subsecond timestamps
7.1. Creating an Ext4 File System
To create an ext4 file system, use the mkfs.ext4 command. In general, the default options are optimal for most usage scenarios, as in:
mkfs.ext4 /dev/device
Below is a sample output of this command, which displays the resulting file system geometry and features:
mke2fs 1.41.9 (22-Aug-2009)
Filesystem label=
OS type: Linux
Block size=4096 (log=2)
Fragment size=4096 (log=2)
1954064 inodes, 7813614 blocks
390680 blocks (5.00%) reserved for the super user
First data block=0
Maximum filesystem blocks=4294967296
239 block groups
32768 blocks per group, 32768 fragments per group
8176 inodes per group
Superblock backups stored on blocks:
	32768, 98304, 163840, 229376, 294912, 819200, 884736, 1605632, 2654208,
	4096000

Writing inode tables: done
Creating journal (32768 blocks): done
Writing superblocks and filesystem accounting information: done
For striped block devices (e.g. RAID5 arrays), the stripe geometry
can be specified at the time of file system creation. Using proper
stripe geometry greatly enhances performance of an ext4 file system.
When creating file systems on lvm or md volumes, mkfs.ext4
chooses an optimal geometry. This may also be true on some hardware
RAIDs which export geometry information to the operating system.
To specify stripe geometry, use the -E option of mkfs.ext4 (i.e. extended file system options) with the following sub-options:
- stride=
value
Specifies the RAID chunk size.
- stripe-width=
value
Specifies the number of data disks in a RAID device, or the number of stripe units in the stripe.
For both sub-options, value
mkfs.ext4 -E stride=16,stripe-width=64 /dev/device
For more information about creating file systems, refer to man mkfs.ext4.
It is possible to use tune2fs to enable
some ext4 features on ext3 file systems, and to use the ext4 driver to
mount an ext3 file system. These actions, however, are not
supported in Red Hat Enterprise Linux 6, as they have not been fully
tested. Because of this, Red Hat cannot guarantee consistent performance
and predictable behavior for ext3 file systems converted or mounted
thusly.
7.2. Mounting an Ext4 File System
An ext4 file system can be mounted with no extra options. For example:
mount /dev/device /mount/point
The ext4 file system also supports several mount options to influence behavior. For example, the acl parameter enables access control lists, while the user_xattr parameter enables user extended attributes. To enable both options, use their respective parameters with -o, as in:
mount -o acl,user_xattr /dev/device /mount/point
The tune2fs utility also allows
administrators to set default mount options in the file system
superblock. For more information on this, refer to man tune2fs.
By default, ext4 uses write barriers to ensure file system integrity
even when power is lost to a device with write caches enabled. For
devices without write caches, or with battery-backed write caches,
disable barriers using the nobarrier option, as in:
mount -o nobarrier /dev/device /mount/point
7.3.
Resizing an Ext4 File System
Before growing an ext4 file system, ensure that the underlying block
device is of an appropriate size to hold the file system later. Use the
appropriate resizing methods for the affected block device.
An ext4 file system may be grown while mounted using the resize2fs command, as in:
resize2fs /mount/point size
The resize2fs command can also decrease the size of an unmounted ext4 file system, as in:
resize2fs /dev/device size
When resizing an ext4 file system, the resize2fs
utility reads the size in units of file system block size, unless a
suffix indicating a specific unit is used. The following suffixes
indicate specific units:
s — 512kb sectors
K — kilobytes
M — megabytes
G — gigabytes
For more information about resizing an ext4 file system, refer to man resize2fs.
7.4. Other Ext4 File System Utilities
Red Hat Enterprise Linux 6 also features other utilities for managing ext4 file systems:
- e2fsck
Used to repair an ext4 file system. This tool checks and repairs
an ext4 file system more efficiently than ext3, thanks to updates in the
ext4 disk structure.
- e2label
Changes the label on an ext4 file system. This tool can also works on ext2 and ext3 file systems.
- quota
Controls and reports on disk space (blocks) and file (inode) usage
by users and groups on an ext4 file system. For more information on
using
quota, refer to
man quota and
Section 15.1, “Configuring Disk Quotas”.
As demonstrated earlier in
Section 7.2, “Mounting an Ext4 File System”, the
tune2fs
utility can also adjust configurable file system parameters for ext2,
ext3, and ext4 file systems. In addition, the following tools are also
useful in debugging and analyzing ext4 file systems:
- debugfs
Debugs ext2, ext3, or ext4 file systems.
- e2image
Saves critical ext2, ext3, or ext4 file system metadata to a file.
For more information about these utilities, refer to their respective man pages.
Chapter 8. Global File System 2
The Red Hat GFS2 file system is a native file system that interfaces
directly with the Linux kernel file system interface (VFS layer). When
implemented as a cluster file system, GFS2 employs distributed metadata
and multiple journals.
GFS2 is based on a 64-bit architecture, which can theoretically
accommodate an 8 EB file system. However, the current supported maximum
size of a GFS2 file system is 100 TB. If your system requires GFS2 file
systems larger than 100 TB, contact your Red Hat service representative.
When determining the size of your file system, you should consider your recovery needs. Running the fsck
command on a very large file system can take a long time and consume a
large amount of memory. Additionally, in the event of a disk or
disk-subsytem failure, recovery time is limited by the speed of your
backup media.
When configured in a Red Hat Cluster Suite, Red Hat GFS2 nodes can be
configured and managed with Red Hat Cluster Suite configuration and
management tools. Red Hat GFS2 then provides data sharing among GFS2
nodes in a Red Hat cluster, with a single, consistent view of the file
system name space across the GFS2 nodes. This allows processes on
different nodes to share GFS2 files in the same way that processes on
the same node can share files on a local file system, with no
discernible difference. For information about the Red Hat Cluster Suite,
refer to Configuring and Managing a Red Hat Cluster.
A GFS2 file system must be created on an LVM logical volume that is a
linear or mirrored volume. LVM logical volumes in a Red Hat Cluster
suite are managed with CLVM, which is a cluster-wide implementation of
LVM, enabled by the CLVM daemon, clvmd,
running in a Red Hat Cluster Suite cluster. The daemon makes it possible
to use LVM2 to manage logical volumes across a cluster, allowing all
nodes in the cluster to share the logical volumes. For information on
the LVM volume manager, see Logical Volume Manager Administration.
The gfs2.ko kernel module implements the GFS2 file system and is loaded on GFS2 cluster nodes.
For comprehensive information on the creation and configuration of
GFS2 file systems in clustered and non-clustered storage, please refer
to the Global File System 2 guide also provided by Red Hat.
Chapter 9.
The XFS File System
XFS is a highly scalable, high-performance file system which was
originally designed at Silicon Graphics, Inc. It was created to support
extremely large filesystems (up to 16 exabytes), files (8 exabytes) and
directory structures (tens of millions of entries).
- Main Features
XFS supports metadata journaling, which
facilitates quicker crash recovery. The XFS file system can also be
defragmented and enlarged while mounted and active. In addition, Red Hat
Enterprise Linux 6 supports backup and restore utilities specific to
XFS.
- Allocation Features
XFS features the following allocation schemes:
Delayed allocation and other performance optimizations affect XFS
the same way that they do ext4. Namely, a program's writes to a an XFS
file system are not guaranteed to be on-disk unless the program issues
an fsync() call afterwards.
For more information on the implications of delayed allocation on a file system, refer to
Allocation Features in
Chapter 7,
The Ext4 File System. The workaround for ensuring writes to disk applies to XFS as well.
- Other XFS Features
The XFS file system also supports the following:
Extended attributes (xattr), which allows the system to associate several additional name/value pairs per file.
Quota journalling, which avoids the need for lengthy quota consistency checks after a crash.
Project/directory quotas, allowing quota restrictions over a directory tree.
Subsecond timestamps
9.1. Creating an XFS File System
To create an XFS file system, use the mkfs.xfs /dev/device command. In general, the default options are optimal for common use.
When using mkfs.xfs on a block device containing an existing file system, use the -f option to force an overwrite of that file system.
Below is a sample output of the mkfs.xfs command:
meta-data=/dev/device            isize=256    agcount=4, agsize=3277258 blks
         =                       sectsz=512   attr=2
data     =                       bsize=4096   blocks=13109032, imaxpct=25
         =                       sunit=0      swidth=0 blks
naming   =version 2              bsize=4096   ascii-ci=0
log      =internal log           bsize=4096   blocks=6400, version=2
         =                       sectsz=512   sunit=0 blks, lazy-count=1
realtime =none                   extsz=4096   blocks=0, rtextents=0
For striped block devices (e.g., RAID5 arrays), the stripe geometry
can be specified at the time of file system creation. Using proper
stripe geometry greatly enhances the performance of an XFS filesystem.
When creating filesystems on lvm or md volumes, mkfs.xfs
chooses an optimal geometry. This may also be true on some hardware
RAIDs which export geometry information to the operating system.
To specify stripe geometry, use the following mkfs.xfs sub-options:
- su=
value
Specifies a stripe unit or RAID chunk size. The valuek, m, or g suffix.
- sw=
value
Specifies the number of data disks in a RAID device, or the number of stripe units in the stripe.
The following example specifies a chunk size of 64k on a RAID device containing 4 stripe units:
mkfs.xfs -d su=64k,sw=4 /dev/device
For more information about creating XFS file systems, refer to man mkfs.xfs.
9.2. Mounting an XFS File System
An XFS file system can be mounted with no extra options, for example:
mount /dev/device /mount/point
XFS also supports several mount options to influence behavior.
By default, XFS allocates inodes to reflect their on-disk location.
However, because some 32-bit userspace applications are not compatible
with inode numbers greater than 232, XFS will allocate all
inodes in disk locations which result in 32-bit inode numbers. This can
lead to decreased performance on very large filesystems (i.e. larger
than 2 terabytes), because inodes are skewed to the beginning of the
block device, while data is skewed towards the end.
To address this, use the inode64 mount
option. This option configures XFS to allocate inodes and data across
the entire file system, which can improve performance:
mount -o inode64 /dev/device /mount/point
By default, XFS uses write barriers to ensure file system integrity
even when power is lost to a device with write caches enabled. For
devices without write caches, or with battery-backed write caches,
disable barriers using the nobarrier option, as in:
mount -o nobarrier /dev/device /mount/point
9.3. XFS Quota Management
The XFS quota subsystem manages limits on disk space (blocks) and
file (inode) usage. XFS quotas control and/or report on usage of these
items on a user, group, or directory/project level. Also, note that
while user, group, and directory/project quotas are enabled
independently, group and project quotas a mutually exclusive.
When managing on a per-directory or per-project basis, XFS manages
the disk usage of directory heirarchies associated with a specific
project. In doing so, XFS recognizes cross-organizational "group"
boundaries between projects. This provides a level of control that is
broader than what is available when managing quotas for users or groups.
XFS quotas are enabled at mount time, with specific mount options. Each mount option can also be specified as noenforce; this will allow usage reporting without enforcing any limits. Valid quota mount options are:
uquota/uqnoenforce - User quotas
gquota/gqnoenforce - Group quotas
pquota/pqnoenforce - Project quota
Once quotas are enabled, the xfs_quota tool can be used to set limits and report on disk usage. By default, xfs_quota is run interactively, and in basic mode. Basic mode sub-commands simply report usage, and are available to all users. Basic xfs_quota sub-commands include:
- quota
username/userID
Show usage and limits for the given usernameuserID
- df
Shows free and used counts for blocks and inodes.
In contrast, xfs_quota also has an expert mode.
The sub-commands of this mode allow actual configuration of limits, and
are available only to users with elevated privileges. To use expert
mode sub-commands interactively, run xfs_quota -x. Expert mode sub-commands include:
- report
/path
Reports quota information for a specific file system.
- limit
Modify quota limits.
For a complete list of sub-commands for either basic or expert mode, use the sub-command help.
All sub-commands can also be run directly from a command line using the -c option, with -x for expert sub-commands. For example, to display a sample quota report for /home (on /dev/blockdevice), use the command xfs_quota -cx 'report -h' /home. This will display output similar to the following:
User quota on /home (/dev/blockdevice)
                        Blocks
User ID      Used   Soft   Hard Warn/Grace
---------- ---------------------------------
root            0      0      0  00 [------]
testuser   103.4G      0      0  00 [------]
...
To set a soft and hard inode count limit of 500 and 700 respectively for user john (whose home directory is /home/john), use the following command:
xfs_quota -x -c 'limit isoft=500 ihard=700 /home/john'
By default, the limit sub-command recognizes targets as users. When configuring the limits for a group, use the -g option (as in the previous example). Similarly, use -p for projects.
Soft and hard block limits can also be configured using bsoft/bhard instead of isoft/ihard. For example, to set a soft and hard block limit of 1000m and 1200m, respectively, to group accounting on the /target/path file system, use the following command:
xfs_quota -x -c 'limit -g bsoft=1000m bhard=1200m accounting' /target/path
While real-time blocks (rtbhard/rtbsoft) are described in man xfs_quota as valid units when setting quotas, the real-time sub-volume is not enabled in this release. As such, the rtbhard and rtbsoft options are not applicable.
Before configuring limits for project-controlled directories, add them first to /etc/projects. Project names can be added to/etc/projectid to map project IDs to project names. Once a project is added to /etc/projects, initialize its project directory using the following command:
xfs_quota -c 'project -s projectname'
Quotas for projects with initialized directories can then be configured, as in:
xfs_quota -x -c 'limit -p bsoft=1000m bhard=1200m projectname'
Generic quota configuration tools (e.g. quota, repquota, edquota) may also be used to manipulate XFS quotas. However, these tools cannot be used with XFS project quotas.
For more information about setting XFS quotas, refer to man xfs_quota.
9.4. Increasing the Size of an XFS File System
An XFS file system may be grown while mounted using the xfs_growfs command, as in:
xfs_growfs /mount/point -D size
The -D size option grows the file system to the specified size-D size option, xfs_growfs will grow the file system to the maximum size supported by the device.
Before growing an XFS file system with -D size,
ensure that the underlying block device is of an appropriate size to
hold the file system later. Use the appropriate resizing methods for the
affected block device.
While XFS file systems can be grown while mounted, their size cannot be reduced at all.
For more information about growing a file system, refer to man xfs_growfs.
9.5.
Repairing an XFS File System
To repair an XFS file system, use xfs_repair, as in:
xfs_repair /dev/device
The xfs_repair utility is highly
scalable, and is designed to repair even very large file systems with
many inodes efficiently. Note that unlike other Linux file systems, xfs_repair does not run at boot time, even when an XFS file system was not cleanly unmounted. In the event of an unclean unmount, xfs_repair simply replays the log at mount time, ensuring a consistent file system.
The xfs_repair utility cannot repair an
XFS file system with a dirty log. To clear the log, mount and unmount
the XFS file system. If the log is corrupt and cannot be replayed, use
the -L option ("force log zeroing") to clear the log, i.e. xfs_repair -L /dev/device. Note, however, that this may result in further corruption or data loss.
For more information about repairing an XFS file system, refer to man xfs_repair.
9.6. Suspending an XFS File System
To suspend or resume write activity to a file system, use xfs_freeze. Suspending write activity allows hardware-based device snapshots to be used to capture the file system in a consistent state.
The xfs_freeze utility is provided by the xfsprogs package, which is only available on x86_64.
To suspend (i.e. freeze) an XFS file system, use:
xfs_freeze -f /mount/point
To unfreeze an XFS file system, use:
xfs_freeze -u /mount/point
When taking an LVM snapshot, it is not necessary to use xfs_freeze
to suspend the file system first. Rather, the LVM management tools will
automatically suspend the XFS file system before taking the snapshot.
You can also use the xfs_freeze utility to freeze/unfreeze an ext3, ext4, GFS2, XFS, and BTRFS, file system. The syntax for doing so is also the same.
For more information about freezing and unfreezing an XFS file system, refer to man xfs_freeze.
9.7.
Backup and Restoration of XFS File Systems
XFS file system backup and restoration involves two utilities: xfsdump and xfsrestore.
To backup or dump an XFS file system, use the xfsdump
utility. Red Hat Enterprise Linux 6 supports backups to tape drives or
regular file images, and also allows multiple dumps to be written to the
same tape. The xfsdump utility also allows a dump to span multiple tapes, although only one dump can be written to a regular file. In addition, xfsdump supports incremental backups, and can exclude files from a backup using size, subtree, or inode flags to filter them.
In order to support incremental backups, xfsdump uses dump levels to determine a base dump to which a specific dump is relative. The -l option specifies a dump level (0-9). To perform a full backup, perform a level 0 dump on the file system (i.e. /path/to/filesystem
xfsdump -l 0 -f /dev/device /path/to/filesystem
The -f option specifies a destination for a backup. For example, the /dev/st0 destination is normally used for tape drives. An xfsdump destination can be a tape drive, regular file, or remote tape device.
In contrast, an incremental backup will only dump files that changed since the last level 0 dump. A level 1 dump is the first incremental dump after a full dump; the next incremental dump would be level 2, and so on, to a maximum of level 9. So, to perform a level 1 dump to a tape drive:
xfsdump -l 1 -f /dev/st0 /path/to/filesystem
Conversely, the xfsrestore utility restores file systems from dumps produced by xfsdump. The xfsrestore utility has two modes: a default simple mode, and a cumulative mode. Specific dumps are identified by session ID or session label.
As such, restoring a dump requires its corresponding session ID or
label. To display the session ID and labels of all dumps (both full and
incremental), use the -I option, as in:
xfsrestore -I
This will provide output similar to the following:
file system 0:
	fs id:		45e9af35-efd2-4244-87bc-4762e476cbab
	session 0:
		mount point:	bear-05:/mnt/test
		device:		bear-05:/dev/sdb2
		time:		Fri Feb 26 16:55:21 2010
		session label:	"my_dump_session_label"
		session id:	b74a3586-e52e-4a4a-8775-c3334fa8ea2c
		level:		0
		resumed:	NO
		subtree:	NO
		streams:	1
		stream 0:
			pathname:	/mnt/test2/backup
			start:		ino 0 offset 0
			end:		ino 1 offset 0
			interrupted:	NO
			media files:	1
			media file 0:
				mfile index:	0
				mfile type:	data
				mfile size:	21016
				mfile start:	ino 0 offset 0
				mfile end:	ino 1 offset 0
				media label:	"my_dump_media_label"
				media id:	4a518062-2a8f-4f17-81fd-bb1eb2e3cb4f
xfsrestore: Restore Status: SUCCESS
The simple mode allows users to restore an entire file system from a level 0 dump. After identifying a level 0 dump's session ID (i.e. session-ID/path/to/destination
xfsrestore -f /dev/st0 -S session-ID /path/to/destination
The -f option specifies the location of the dump, while the -S or -L option specifies which specific dump to restore. The -S option is used to specify a session ID, while the -L option is used for session labels. The -I option displays both session labels and IDs for each dump.
xfsrestore Cumulative Mode
The cumulative mode of xfsrestore allows file system restoration from a specific incremental backup, i.e. level 1 to level 9. To restore a file system from an incremental backup, simply add the -r option, as in:
xfsrestore -f /dev/st0 -S session-ID -r /path/to/destination
The xfsrestore utility also allows specific files from a dump to be extracted, added, or deleted. To use xfsrestore interactively, use the -i option, as in:
xfsrestore -f /dev/st0 -i
The interactive dialogue will begin after xfsrestore finishes reading the specified device. Available commands in this dialogue include cd, ls, add, delete, and extract; for a complete list of commands, use help.
For more information about dumping and restoring XFS file systems, refer to man xfsdump and man xfsrestore.
9.8. Other XFS File System Utilities
Red Hat Enterprise Linux 6 also features other utilities for managing XFS file systems:
- xfs_fsr
Used to defragment mounted XFS file systems. When invoked with no arguments, xfs_fsr
defragments all regular files in all mounted XFS file systems. This
utility also allows users to suspend a defragmentation at a specified
time and resume from where it left off later.
In addition, xfs_fsr also allows the defragmentation of only one file, as in xfs_fsr /path/to/file. Red Hat advises against periodically defragmenting an entire file system, as this is normally not warranted.
- xfs_bmap
Prints the map of disk blocks used by files in an XFS filesystem.
This map list each extent used by a specified file, as well as regions
in the file with no corresponding blocks (i.e. holes).
- xfs_info
Prints XFS file system information.
- xfs_admin
Changes the parameters of an XFS file system. The xfs_admin utility can only modify parameters of unmounted devices/file systems.
- xfs_copy
Copies the contents of an entire XFS file system to one or more targets in parallel.
The following utilities are also useful in debugging and analyzing XFS file systems:
- xfs_metadump
Copies XFS file system metadata to a file. The xfs_metadump
utility should only be used to copy unmounted, read-only, or
frozen/suspended file systems; otherwise, generated dumps could be
corrupted or inconsistent.
- xfs_mdrestore
Restores and XFS metadump image (generated using xfs_metadump) to a file system image.
- xfs_db
Debugs an XFS file system.
For more information about these utilities, refer to their respective man pages.
Chapter 10.
Network File System (NFS)
A Network File System (NFS)
allows remote hosts to mount file systems over a network and interact
with those file systems as though they are mounted locally. This enables
system administrators to consolidate resources onto centralized servers
on the network.
This chapter focuses on fundamental NFS concepts and supplemental information.
Currently, there are three versions of NFS. NFS version 2 (NFSv2) is
older and is widely supported. NFS version 3 (NFSv3) supports safe
asynchronous writes and a more robust error handling than NFSv2; it also
supports 64-bit file sizes and offsets, allowing clients to access more
than 2Gb of file data.
NFS version 4 (NFSv4) works through firewalls and on the Internet, no longer requires an rpcbind
service, supports ACLs, and utilizes stateful operations. Red Hat
Enterprise Linux supports NFSv2, NFSv3, and NFSv4 clients. When mounting
a file system via NFS, Red Hat Enterprise Linux uses NFSv4 by default,
if the server supports it.
All versions of NFS can use Transmission Control Protocol (TCP) running over an IP network, with NFSv4 requiring it. NFSv2 and NFSv3 can use the User Datagram Protocol (UDP) running over an IP network to provide a stateless network connection between the client and server.
When using NFSv2 or NFSv3 with UDP, the stateless UDP connection
(under normal conditions) has less protocol overhead than TCP. This can
translate into better performance on very clean, non-congested networks.
However, because UDP is stateless, if the server goes down
unexpectedly, UDP clients continue to saturate the network with requests
for the server. In addition, when a frame is lost with UDP, the entire
RPC request must be retransmitted; with TCP, only the lost frame needs
to be resent. For these reasons, TCP is the preferred protocol when
connecting to an NFS server.
The mounting and locking protocols have been incorporated into the
NFSv4 protocol. The server also listens on the well-known TCP port 2049.
As such, NFSv4 does not need to interact with rpcbind[], rpc.lockd, and rpc.statd daemons. The rpc.mountd daemon is still required on the NFS server so set up the exports, but is not involved in any over-the-wire operations.
TCP is the default transport protocol for NFS version 2 and 3 under
Red Hat Enterprise Linux. UDP can be used for compatibility purposes as
needed, but is not recommended for wide usage. NFSv4 requires TCP.
All the RPC/NFS daemon have a '-p' command line option that can set the port, making firewall configuration easier.
After TCP wrappers grant access to the client, the NFS server refers to the /etc/exports
configuration file to determine whether the client is allowed to access
any exported file systems. Once verified, all file and directory
operations are available to the user.
In order for NFS to work with a default installation of Red Hat
Enterprise Linux with a firewall enabled, configure IPTables with the
default TCP port 2049. Without proper IPTables configuration, NFS will
not function properly.
The NFS initialization script and rpc.nfsd
process now allow binding to any specified port during system start up.
However, this can be error-prone if the port is unavailable, or if it
conflicts with another daemon.
10.1.1. Required Services
Red Hat Enterprise Linux uses a combination of kernel-level support
and daemon processes to provide NFS file sharing. All NFS versions rely
on Remote Procedure Calls (RPC) between clients and servers. RPC services under Red Hat Enterprise Linux 6 are controlled by the rpcbind
service. To share or mount NFS file systems, the following services
work together, depending on which version of NFS is implemented:
The portmap service was used to map
RPC program numbers to IP address port number combinations in earlier
versions of Red Hat Enterprise Linux. This service is now replaced by rpcbind in Red Hat Enterprise Linux 6 to enable IPv6 support. For more information about this change, refer to the following links:
- nfs
service nfs start starts the NFS server and the appropriate RPC processes to service requests for shared NFS file systems.
- nfslock
service nfslock start activates a mandatory service that starts the appropriate RPC processes which allow NFS clients to lock files on the server.
- rpcbind
rpcbind accepts port reservations
from local RPC services. These ports are then made available (or
advertised) so the corresponding remote RPC services can access them. rpcbind responds to requests for RPC services and sets up connections to the requested RPC service. This is not used with NFSv4.
The following RPC processes facilitate NFS services:
- rpc.mountd
This process receives mount requests from NFS clients and
verifies that the requested file system is currently exported. This
process is started automatically by the nfs service and does not require user configuration.
- rpc.nfsd
rpc.nfsd allows explicit NFS
versions and protocols the server advertises to be defined. It works
with the Linux kernel to meet the dynamic demands of NFS clients, such
as providing server threads each time an NFS client connects. This
process corresponds to the nfs service.
- rpc.lockd
rpc.lockd allows NFS clients to lock files on the server. If rpc.lockd is not started, file locking will fail. rpc.lockd implements the Network Lock Manager (NLM) protocol. This process corresponds to the nfslock service. This is not used with NFSv4.
- rpc.statd
This process implements the Network Status Monitor (NSM) RPC protocol, which notifies NFS clients when an NFS server is restarted without being gracefully brought down. rpc.statd is started automatically by the nfslock service, and does not require user configuration. This is not used with NFSv4.
- rpc.rquotad
This process provides user quota information for remote users. rpc.rquotad is started automatically by the nfs service and does not require user configuration.
- rpc.idmapd
rpc.idmapd provides NFSv4 client and server upcalls, which map between on-the-wire NFSv4 names (which are strings in the form of user@domainidmapd to function with NFSv4, the /etc/idmapd.conf must be configured. This service is required for use with NFSv4, although not when all hosts share the same DNS domain name.
10.2. NFS Client Configuration
The mount command mounts NFS shares on the client side. Its format is as follows:
mount -t nfs -o options host:/remote/export /local/directory
This command uses the following variables:
optionsserver
The hostname, IP address, or fully qualified domain name of the server exporting the file system you wish to mount
/remote/export
The file system / directory being exported from server, i.e. the directory you wish to mount
/local/directory
The client location where /remote/export should be mounted
The NFS protocol version used in Red Hat Enterprise Linux 6 is identified by the mount options nfsvers or vers. By default, mount will use NFSv4 with mount -t nfs.
If the server does not support NFSv4, the client will automatically
step down to a version supported by the server. If you use the nfsvers/vers
option to pass a particular version not supported by the server, the
mount will fail. The file system type nfs4 is also available for legacy
reasons; this is equivalent to running mount -t nfs -o nfsvers=4 host:/remote/export /local/directory.
Refer to man mount for more details.
10.2.1. Mounting NFS File Systems using /etc/fstab
An alternate way to mount an NFS share from another machine is to add a line to the
/etc/fstab
file. The line must state the hostname of the NFS server, the directory
on the server being exported, and the directory on the local machine
where the NFS share is to be mounted. You must be root to modify the
/etc/fstab file.
The general syntax for the line in /etc/fstab is as follows:
server:/usr/local/pub /pub nfs rsize=8192,wsize=8192,timeo=14,intr
The mount point /pub must exist on the client machine before this command can be executed. After adding this line to /etc/fstab on the client system, use the command mount /pub, and the mount point /pub is mounted from the server.
The /etc/fstab file is referenced by the netfs service at boot time, so lines referencing NFS shares have the same effect as manually typing the mount command during the boot process.
A valid /etc/fstab entry to mount an NFS export should contain the following information:
server:/remote/export /local/directory nfs options 0 0
The variables
server,
/remote/export,
/local/directory, and
options are the same ones used when manually mounting an NFS share. Refer to
Section 10.2, “NFS Client Configuration” for a definition of each variable.
The mount point /local/directory must exist on the client before /etc/fstab is read. Otherwise, the mount will fail.
For more information about /etc/fstab, refer to man fstab.
One drawback to using /etc/fstab is
that, regardless of how infrequently a user accesses the NFS mounted
file system, the system must dedicate resources to keep the mounted file
system in place. This is not a problem with one or two mounts, but when
the system is maintaining mounts to many systems at one time, overall
system performance can be affected. An alternative to /etc/fstab is to use the kernel-based automount utility. An automounter consists of two components:
The automount utility can mount and
unmount NFS file systems automatically (on-demand mounting), therefore
saving system resources. It can be used to mount other file systems
including AFS, SMBFS, CIFS, and local file systems.
autofs uses /etc/auto.master
(master map) as its default primary configuration file. This can be
changed to use another supported network source and name using the autofs configuration (in /etc/sysconfig/autofs) in conjunction with the Name Service Switch (NSS) mechanism. An instance of the autofs
version 4 daemon was run for each mount point configured in the master
map and so it could be run manually from the command line for any given
mount point. This is not possible with autofs
version 5, because it uses a single daemon to manage all configured
mount points; as such, all automounts must be configured in the master
map. This is in line with the usual requirements of other industry
standard automounters. Mount point, hostname, exported directory, and
options can all be specified in a set of files (or other supported
network sources) rather than configuring them manually for each host.
10.3.1. Improvements in autofs Version 5 over Version 4
autofs version 5 features the following enhancements over version 4:
- Direct map support
Direct maps in autofs provide a
mechanism to automatically mount file systems at arbitrary points in the
file system hierarchy. A direct map is denoted by a mount point of /-
in the master map. Entries in a direct map contain an absolute path
name as a key (instead of the relative path names used in indirect
maps).
- Lazy mount and unmount support
Multi-mount map entries describe a hierarchy of mount points under a single key. A good example of this is the -hosts map, commonly used for automounting all exports from a host under "/net/host" as a multi-mount map entry. When using the "-hosts" map, an 'ls' of "/net/host" will mount autofs trigger mounts for each export from host
and mount and expire them as they are accessed. This can greatly reduce
the number of active mounts needed when accessing a server with a large
number of exports.
- Enhanced LDAP support
The Lightweight Directory Access Protocol (LDAP) support in autofs version 5 has been enhanced in several ways with respect to autofs version 4. The autofs configuration file (/etc/sysconfig/autofs) provides a mechanism to specify the autofs
schema that a site implements, thus precluding the need to determine
this via trial and error in the application itself. In addition,
authenticated binds to the LDAP server are now supported, using most
mechanisms supported by the common LDAP server implementations. A new
configuration file has been added for this support: /etc/autofs_ldap_auth.conf. The default configuration file is self-documenting, and uses an XML format.
- Proper use of the Name Service Switch (
nsswitch) configuration.
The Name Service Switch configuration file exists to provide a
means of determining from where specific configuration data comes. The
reason for this configuration is to allow administrators the flexibility
of using the back-end database of choice, while maintaining a uniform
software interface to access the data. While the version 4 automounter
is becoming increasingly better at handling the NSS configuration, it is
still not complete. Autofs version 5, on the other hand, is a complete
implementation.
Refer to man nsswitch.conf for more
information on the supported syntax of this file. Please note that not
all NSS databases are valid map sources and the parser will reject ones
that are invalid. Valid sources are files, yp, nis, nisplus, ldap, and hesiod.
- Multiple master map entries per autofs mount point
One thing that is frequently used but not yet mentioned is the
handling of multiple master map entries for the direct mount point /-. The map keys for each entry are merged and behave as one map.
An example is seen in the connectathon test maps for the direct mounts below:
/- /tmp/auto_dcthon
/- /tmp/auto_test3_direct
/- /tmp/auto_test4_direct
10.3.2. autofs Configuration
The primary configuration file for the automounter is
/etc/auto.master, also referred to as the master map which may be changed as described in the
Section 10.3.1, “Improvements in autofs Version 5 over Version 4”. The master map lists
autofs-controlled
mount points on the system, and their corresponding configuration files
or network sources known as automount maps. The format of the master
map is as follows:
mount-point map-name options
The variables used in this format are:
mount-point
The autofs mount point e.g /home.
map-name
The name of a map source which contains a list of mount points,
and the file system location from which those mount points should be
mounted. The syntax for a map entry is described below.
options
If supplied, these will apply to all entries in the given map
provided they don't themselves have options specified. This behavior is
different from autofs version 4 where options where cumulative. This has been changed to implement mixed environment compatibility.
The following is a sample line from /etc/auto.master file (displayed with cat /etc/auto.master):
/home /etc/auto.misc
The general format of maps is similar to the master map, however the
"options" appear between the mount point and the location instead of at
the end of the entry as in the master map:
mount-point [options] location
The variables used in this format are:
mount-point
This refers to the autofs mount
point. This can be a single directory name for an indirect mount or the
full path of the mount point for direct mounts. Each direct and indirect
map entry key (mount-point
options
Whenever supplied, these are the mount options for the map entries that do not specify their own options.
location
This refers to the file system location such as a local file
system path (preceded with the Sun map format escape character ":" for
map names beginning with "/"), an NFS file system or other valid file
system location.
The following is a sample of contents from a map file (i.e. /etc/auto.misc):
payroll -fstype=nfs personnel:/dev/hda3
sales -fstype=ext3 :/dev/hda4
The first column in a map file indicates the autofs mount point (sales and payroll from the server called personnel). The second column indicates the options for the autofs
mount while the third column indicates the source of the mount.
Following the above configuration, the autofs mount points will be /home/payroll and /home/sales. The -fstype= option is often omitted and is generally not needed for correct operation.
The automounter will create the directories if they do not exist. If
the directories exist before the automounter was started, the
automounter will not remove them when it exits. You can start or restart
the automount daemon by issuing either of the following two commands:
service autofs start
service autofs restart
Using the above configuration, if a process requires access to an autofs unmounted directory such as /home/payroll/2006/July.sxc,
the automount daemon automatically mounts the directory. If a timeout
is specified, the directory will automatically be unmounted if the
directory is not accessed for the timeout period.
You can view the status of the automount daemon by issuing the following command:
service autofs status
10.3.3. Overriding or Augmenting Site Configuration Files
It can be useful to override site defaults for a specific mount point
on a client system. For example, consider the following conditions:
Automounter maps are stored in NIS and the /etc/nsswitch.conf file has the following directive:
automount: files nis
The auto.master file contains the following
+auto.master
The NIS auto.master map file contains the following:
/home auto.home
The NIS auto.home map contains the following:
beth        fileserver.example.com:/export/home/beth
joe        fileserver.example.com:/export/home/joe
*       fileserver.example.com:/export/home/&
The file map /etc/auto.home does not exist.
Given these conditions, let's assume that the client system needs to override the NIS map auto.home and mount home directories from a different server. In this case, the client will need to use the following /etc/auto.master map:
/home /etc/auto.home
+auto.master
And the /etc/auto.home map contains the entry:
* labserver.example.com:/export/home/&
Because the automounter only processes the first occurrence of a mount point, /home will contain the contents of /etc/auto.home instead of the NIS auto.home map.
Alternatively, if you just want to augment the site-wide auto.home map with a few entries, create a /etc/auto.home file map, and in it put your new entries and at the end, include the NIS auto.home map. Then the /etc/auto.home file map might look similar to:
mydir someserver:/export/mydir
+auto.home
Given the NIS auto.home map listed above, ls /home would now output:
beth joe mydir
This last example works as expected because autofs knows not to include the contents of a file map of the same name as the one it is reading. As such, autofs moves on to the next map source in the nsswitch configuration.
10.3.4. Using LDAP to Store Automounter Maps
LDAP client libraries must be installed on all systems configured to
retrieve automounter maps from LDAP. On Red Hat Enterprise Linux, the openldap package should be installed automatically as a dependency of the automounter. To configure LDAP access, modify /etc/openldap/ldap.conf. Ensure that BASE, URI, and schema are set appropriately for your site.
The most recently established schema for storing automount maps in LDAP is described by rfc2307bis. To use this schema it is necessary to set it in the autofs configuration (/etc/sysconfig/autofs) by removing the comment characters from the schema definition. For example:
DEFAULT_MAP_OBJECT_CLASS="automountMap"
DEFAULT_ENTRY_OBJECT_CLASS="automount"
DEFAULT_MAP_ATTRIBUTE="automountMapName"
DEFAULT_ENTRY_ATTRIBUTE="automountKey"
DEFAULT_VALUE_ATTRIBUTE="automountInformation"
Ensure that these are the only schema entries not commented in the configuration. Note that the automountKey replaces the cn attribute in the rfc2307bis schema. An LDIF of a sample configuration is described below:
# extended LDIF
#
# LDAPv3
# base <> with scope subtree
# filter: (&(objectclass=automountMap)(automountMapName=auto.master))
# requesting: ALL
#

# auto.master, example.com
dn: automountMapName=auto.master,dc=example,dc=com
objectClass: top
objectClass: automountMap
automountMapName: auto.master

# extended LDIF
#
# LDAPv3
# base <automountMapName=auto.master,dc=example,dc=com> with scope subtree
# filter: (objectclass=automount)
# requesting: ALL
#

# /home, auto.master, example.com
dn: automountMapName=auto.master,dc=example,dc=com
objectClass: automount
cn: /home

automountKey: /home
automountInformation: auto.home

# extended LDIF
#
# LDAPv3
# base <> with scope subtree
# filter: (&(objectclass=automountMap)(automountMapName=auto.home))
# requesting: ALL
#

# auto.home, example.com
dn: automountMapName=auto.home,dc=example,dc=com
objectClass: automountMap
automountMapName: auto.home

# extended LDIF
#
# LDAPv3
# base <automountMapName=auto.home,dc=example,dc=com> with scope subtree
# filter: (objectclass=automount)
# requesting: ALL
#

# foo, auto.home, example.com
dn: automountKey=foo,automountMapName=auto.home,dc=example,dc=com
objectClass: automount
automountKey: foo
automountInformation: filer.example.com:/export/foo

# /, auto.home, example.com
dn: automountKey=/,automountMapName=auto.home,dc=example,dc=com
objectClass: automount
automountKey: /
automountInformation: filer.example.com:/export/&
10.4. Common NFS Mount Options
Beyond mounting a file system via NFS on a remote host, you can also
specify other options at mount time to make the mounted share easier to
use. These options can be used with manual mount commands, /etc/fstab settings, and autofs.
The following are options commonly used for NFS mounts:
- intr
Allows NFS requests to be interrupted if the server goes down or cannot be reached.
- lookupcache=
mode
Specifies how the kernel should manage its cache of directory entries for a given mount point. Valid arguments for mode are all, none, or pos/positive.
- nfsvers=
version
Specifies which version of the NFS protocol to use, where version
is 2, 3, or 4. This is useful for hosts that run multiple NFS servers.
If no version is specified, NFS uses the highest version supported by
the kernel and mount command.
The option vers is identical to nfsvers, and is included in this release for compatibility reasons.
- noacl
Turns off all ACL processing. This may be needed when interfacing
with older versions of Red Hat Enterprise Linux, Red Hat Linux, or
Solaris, since the most recent ACL technology is not compatible with
older systems.
- nolock
Disables file locking. This setting is occasionally required when connecting to older NFS servers.
- noexec
Prevents execution of binaries on mounted file systems. This is
useful if the system is mounting a non-Linux file system containing
incompatible binaries.
- nosuid
Disables set-user-identifier or set-group-identifier bits. This prevents remote users from gaining higher privileges by running a setuid program.
- port=
num
port=num — Specifies the numeric value of the NFS server port. If num0 (the default), then mount queries the remote host's rpcbind service for the port number to use. If the remote host's NFS daemon is not registered with its rpcbind service, the standard NFS port number of TCP 2049 is used instead.
- rsize=
num and wsize=num
These settings speed up NFS communication for reads (rsize) and writes (wsize) by setting a larger data block size (num,
in bytes), to be transferred at one time. Be careful when changing
these values; some older Linux kernels and network cards do not work
well with larger block sizes. For NFSv2 or NFSv3, the default values for
both parameters is set to 8192. For NFSv4, the default values for both
parameters is set to 32768.
- sec=
mode
Specifies the type of security to utilize when authenticating an NFS connection. Its default setting is sec=sys, which uses local UNIX UIDs and GIDs by using AUTH_SYS to authenticate NFS operations.
sec=krb5 uses Kerberos V5 instead of local UNIX UIDs and GIDs to authenticate users.
sec=krb5i uses Kerberos V5 for user
authentication and performs integrity checking of NFS operations using
secure checksums to prevent data tampering.
sec=krb5p uses Kerberos V5 for user
authentication, integrity checking, and encrypts NFS traffic to prevent
traffic sniffing. This is the most secure setting, but it also involves
the most performance overhead.
- tcp
Instructs the NFS mount to use the TCP protocol.
- udp
Instructs the NFS mount to use the UDP protocol.
For a complete list of options and more detailed information on each one, refer to
man mount and
man nfs. For more information on using NFS via TCP or UDP protocols, refer to
Section 10.9, “Using NFS over TCP”.
10.5. Starting and Stopping NFS
To run an NFS server, the rpcbind[] service must be running. To verify that rpcbind is active, use the following command:
service rpcbind status
Using service command to start, stop, or restart a daemon requires root privileges.
If the rpcbind service is running, then the nfs service can be started. To start an NFS server, use the following command as root:
service nfs start
nfslock must also be started for both the NFS client and server to function properly. To start NFS locking, use the following command:
service nfslock start
If NFS is set to start at boot, ensure that nfslock also starts by running chkconfig --list nfslock. If nfslock is not set to on, this implies that you will need to manually run the service nfslock start each time the computer starts. To set nfslock to automatically start on boot, use chkconfig nfslock on.
nfslock is only needed for NFSv2 and NFSv3.
To stop the server, use:
service nfs stop
The restart option is a shorthand way of
stopping and then starting NFS. This is the most efficient way to make
configuration changes take effect after editing the configuration file
for NFS. To restart the server, as root, type:
service nfs restart
The condrestart (conditional restart) option only starts nfs
if it is currently running. This option is useful for scripts, because
it does not start the daemon if it is not running. To conditionally
restart the server, as root, type:
service nfs condrestart
To reload the NFS server configuration file without restarting the service, as root, type:
service nfs reload
10.6. NFS Server Configuration
There are two ways to configure an NFS server:
By manually editing the NFS configuration file, i.e. /etc/exports
Through the command line, i.e. through exportfs
10.6.1.
The /etc/exports Configuration File
The /etc/exports file controls which file systems are exported to remote hosts and specifies options. It follows the following syntax rules:
Blank lines are ignored.
To add a comment, start a line with the hash mark (#).
You can wrap long lines with a backslash (\).
Each exported file system should be on its own individual line.
Any lists of authorized hosts placed after an exported file system must be separated by space characters.
Options for each of the hosts must be placed in parentheses directly
after the host identifier, without any spaces separating the host and
the first parenthesis.
Each entry for an exported file system has the following structure:
export host(options)
The aforementioned structure uses the following variables:
export
The directory being exported
host
The host or network to which the export is being shared
options
The options to be used for host
You can specify multiple hosts, along with specific options for each
host. To do so, list them on the same line as a space-delimited list,
with each hostname followed by its respective options (in parentheses),
as in:
export host1(options1) host2(options2) host3(options3)
In its simplest form, the /etc/exports file only specifies the exported directory and the hosts permitted to access it, as in the following example:
/exported/directory bob.example.com
Here, bob.example.com can mount /exported/directory/ from the NFS server. Because no options are specified in this example, NFS will use default settings, which are:
- ro
The exported file system is read-only. Remote hosts cannot change
the data shared on the file system. To allow hosts to make changes to
the file system (i.e. read/write), specify the rw option.
- sync
The NFS server will not reply to requests before changes made by
previous requests are written to disk. To enable asynchronous writes
instead, specify the option async.
- wdelay
The NFS server will delay writing to the disk if it suspects
another write request is imminent. This can improve performance as it
reduces the number of times the disk must be accesses by separate write
commands, thereby reducing write overhead. To disable this, specify the no_wdelay; note that no_wdelay is only available if the default sync option is also specified.
- root_squash
This prevents root users connected remotely from having root
privileges; instead, the NFS server will assign them the user ID nfsnobody.
This effectively "squashes" the power of the remote root user to the
lowest local user, preventing possible unauthorized writes on the remote
server. To disable root squashing, specify no_root_squash.
To squash every remote user (including root), use all_squash. To specify the user and group IDs that the NFS server should assign to remote users from a particular host, use the anonuid and anongid options, respectively, as in:
export host(anonuid=uid,anongid=gid)
Here, uid and gid are user ID number and group ID number, respectively. The anonuid and anongid options allow you to create a special user/group account for remote NFS users to share.
By default, access control lists (ACLs) are supported by NFS under Red Hat Enterprise Linux. To disable this feature, specify the no_acl option when exporting the file system.
Each default for every exported file system must be explicitly overridden. For example, if the rw option is not specified, then the exported file system is shared as read-only. The following is a sample line from /etc/exports which overrides two default options:
/another/exported/directory 192.168.0.3(rw,async)
In this example 192.168.0.3 can mount /another/exported/directory/ read/write and all writes to disk are asynchronous. For more information on exporting options, refer to man exportfs.
Additionally, other options are available where no default value is
specified. These include the ability to disable sub-tree checking, allow
access from insecure ports, and allow insecure file locks (necessary
for certain early NFS client implementations). Refer to man exports for details on these less-used options.
The format of the /etc/exports file is
very precise, particularly in regards to use of the space character.
Remember to always separate exported file systems from hosts and hosts
from one another with a space character. However, there should be no
other space characters in the file except on comment lines.
For example, the following two lines do not mean the same thing:
/home bob.example.com(rw)
/home bob.example.com (rw)
The first line allows only users from bob.example.com read/write access to the /home directory. The second line allows users from bob.example.com to mount the directory as read-only (the default), while the rest of the world can mount it read/write.
10.6.2. The exportfs Command
Every file system being exported to remote users via NFS, as well as
the access level for those file systems, are listed in the /etc/exports file. When the nfs service starts, the /usr/sbin/exportfs command launches and reads this file, passes control to rpc.mountd (if NFSv2 or NFSv3) for the actual mounting process, then to rpc.nfsd where the file systems are then available to remote users.
When issued manually, the /usr/sbin/exportfs
command allows the root user to selectively export or unexport
directories without restarting the NFS service. When given the proper
options, the /usr/sbin/exportfs command writes the exported file systems to /var/lib/nfs/xtab. Since rpc.mountd refers to the xtab file when deciding access privileges to a file system, changes to the list of exported file systems take effect immediately.
The following is a list of commonly-used options available for /usr/sbin/exportfs:
- -r
Causes all directories listed in /etc/exports to be exported by constructing a new export list in /etc/lib/nfs/xtab. This option effectively refreshes the export list with any changes made to /etc/exports.
- -a
Causes all directories to be exported or unexported, depending on what other options are passed to /usr/sbin/exportfs. If no other options are specified, /usr/sbin/exportfs exports all file systems specified in /etc/exports.
- -o
file-systems
Specifies directories to be exported that are not listed in
/etc/exports. Replace
file-systems with additional file systems to be exported. These file systems must be formatted in the same way they are specified in
/etc/exports. Refer to
Section 10.6.1, “
The /etc/exports Configuration File” for more information on
/etc/exports
syntax. This option is often used to test an exported file system
before adding it permanently to the list of file systems to be exported.
- -i
Ignores /etc/exports; only options given from the command line are used to define exported file systems.
- -u
Unexports all shared directories. The command /usr/sbin/exportfs -ua suspends NFS file sharing while keeping all NFS daemons up. To re-enable NFS sharing, use exportfs -r.
- -v
Verbose operation, where the file systems being exported or unexported are displayed in greater detail when the exportfs command is executed.
If no options are passed to the exportfs command, it displays a list of currently exported file systems. For more information about the exportfs command, refer to man exportfs.
10.6.2.1. Using exportfs with NFSv4
The exportfs command is used to maintain the NFS table of exported file systems. When used with no arguments, exportfs shows all the exported directories.
Since NFSv4 no longer utilizes the MOUNT protocol, which was used with the NFSv2 and NFSv3 protocols, the mounting of file systems has changed.
An NFSv4 client now has the ability to see all of the exports served
by the NFSv4 server as a single file system, called the NFSv4
pseudo-file system. On Red Hat Enterprise Linux, the pseudo-file system
is identified as a single, real file system, identified at export with
the fsid=0 option.
10.6.3. Running NFS Behind a Firewall
NFS requires rpcbind, which dynamically
assigns ports for RPC services and can cause problems for configuring
firewall rules. To allow clients to access NFS shares behind a firewall,
edit the /etc/sysconfig/nfs configuration file to control which ports the required RPC services run on.
The /etc/sysconfig/nfs may not exist by default on all systems. If it does not exist, create it and add the following variables, replacing port with an unused port number (alternatively, if the file exists, un-comment and change the default entries as required):
MOUNTD_PORT=port
Controls which TCP and UDP port mountd (rpc.mountd) uses.
STATD_PORT=port
Controls which TCP and UDP port status (rpc.statd) uses.
LOCKD_TCPPORT=port
Controls which TCP port nlockmgr (rpc.lockd) uses.
LOCKD_UDPPORT=port
Controls which UDP port nlockmgr (rpc.lockd) uses.
If NFS fails to start, check /var/log/messages. Normally, NFS will fail to start if you specify a port number that is already in use. After editing /etc/sysconfig/nfs, restart the NFS service using service nfs restart. Run the rpcinfo -p command to confirm the changes.
To configure a firewall to allow NFS, perform the following steps:
Allow TCP and UDP port 2049 for NFS.
Allow TCP and UDP port 111 (rpcbind/sunrpc).
Allow the TCP and UDP port specified with MOUNTD_PORT="port"
Allow the TCP and UDP port specified with STATD_PORT="port"
Allow the TCP port specified with LOCKD_TCPPORT="port"
Allow the UDP port specified with LOCKD_UDPPORT="port"
NFS is well-suited for sharing entire file systems with a large
number of known hosts in a transparent manner. However, with ease-of-use
comes a variety of potential security problems. Consider the following
sections when exporting NFS file systems on a server or mounting them on
a client. Doing so minimizes NFS security risks and better protects
data on the server. server.
10.7.1. Host Access in NFSv2 or NFSv3
NFS controls who can mount an exported file system based on the host
making the mount request, not the user that actually uses the file
system. Hosts must be given explicit rights to mount the exported file
system. Access control is not possible for users, other than through
file and directory permissions. In other words, once a file system is
exported via NFS, any user on any remote host connected to the NFS
server can access the shared data. To limit the potential risks,
administrators often allow read-only access or squash user permissions
to a common user and group ID. Unfortunately, these solutions prevent
the NFS share from being used in the way it was originally intended.
Additionally, if an attacker gains control of the DNS server used by
the system exporting the NFS file system, the system associated with a
particular hostname or fully qualified domain name can be pointed to an
unauthorized machine. At this point, the unauthorized machine is
the system permitted to mount the NFS share, since no username or
password information is exchanged to provide additional security for the
NFS mount.
Wildcards should be used sparingly when exporting directories via
NFS, as it is possible for the scope of the wildcard to encompass more
systems than intended.
You can also to restrict access to the rpcbind[] service via TCP wrappers. Creating rules with iptables can also limit access to ports used by rpcbind, rpc.mountd, and rpc.nfsd.
For more information on securing NFS and rpcbind, refer to man iptables.
10.7.2. Host Access in NFSv4
The release of NFSv4 brought a revolution to authentication and
security to NFS exports. NFSv4 mandates the implementation of the RPCSEC_GSS
kernel module, the Kerberos version 5 GSS-API mechanism, SPKM-3, and
LIPKEY. With NFSv4, the mandatory security mechanisms are oriented
towards authenticating individual users, and not client machines as used
in NFSv2 and NFSv3. As such, for security reasons, Red Hat recommends
the use of NFSv4 over other versions whenever possible.
It is assumed that a Kerberos ticket-granting server (KDC) is
installed and configured correctly, prior to configuring an NFSv4
server. Kerberos is a network authentication system which allows clients
and servers to authenticate to each other through use of symmetric
encryption and a trusted third party, the KDC.
NFSv4 includes ACL support based on the Microsoft Windows NT model,
not the POSIX model, because of the former's features and wide
deployment. NFSv2 and NFSv3 do not have support for native ACL
attributes.
Another important security feature of NFSv4 is the removal of the use of the MOUNT
protocol for mounting file systems. This protocol presented possible
security holes because of the way that it processed file handles.
Once the NFS file system is mounted read/write by a remote host, the
only protection each shared file has is its permissions. If two users
that share the same user ID value mount the same NFS file system, they
can modify each others files. Additionally, anyone logged in as root on
the client system can use the su - command to access any files via the NFS share.
By default, access control lists (ACLs) are supported by NFS under
Red Hat Enterprise Linux. Red Hat recommends that you keep this feature
enabled.
By default, NFS uses
root squashing when
exporting a file system. This sets the user ID of anyone accessing the
NFS share as the root user on their local machine to
nobody. Root squashing is controlled by the default option
root_squash; for more information about this option, refer to
Section 10.6.1, “
The /etc/exports Configuration File”. If possible, never disable root squashing.
When exporting an NFS share as read-only, consider using the all_squash option. This option makes every user accessing the exported file system take the user ID of the nfsnobody user.
The following section only applies to NFSv2 or NFSv3 implementations that require the rpcbind service for backward compatibility.
The rpcbind[] utility maps RPC services to the ports on which they listen. RPC processes notify rpcbind
when they start, registering the ports they are listening on and the
RPC program numbers they expect to serve. The client system then
contacts rpcbind on the server with a particular RPC program number. The rpcbind service redirects the client to the proper port number so it can communicate with the requested service.
Because RPC-based services rely on rpcbind to make all connections with incoming client requests, rpcbind must be available before any of these services start.
The rpcbind service uses TCP wrappers for access control, and access control rules for rpcbind affect all RPC-based services. Alternatively, it is possible to specify access control rules for each of the NFS RPC daemons. The man pages for rpc.mountd and rpc.statd contain information regarding the precise syntax for these rules.
10.8.1.
Troubleshooting NFS and rpcbind
Because rpcbind[]
provides coordination between RPC services and the port numbers used to
communicate with them, it is useful to view the status of current RPC
services using rpcbind when troubleshooting. The rpcinfo
command shows each RPC-based service with port numbers, an RPC program
number, a version number, and an IP protocol type (TCP or UDP).
To make sure the proper NFS RPC-based services are enabled for rpcbind, issue the following command as root:
rpcinfo -p
The following is sample output from this command:
program vers proto   port
100021    1   udp  32774  nlockmgr
100021    3   udp  32774  nlockmgr
100021    4   udp  32774  nlockmgr
100021    1   tcp  34437  nlockmgr
100021    3   tcp  34437  nlockmgr
100021    4   tcp  34437  nlockmgr
100011    1   udp    819  rquotad
100011    2   udp    819  rquotad
100011    1   tcp    822  rquotad
100011    2   tcp    822  rquotad
100003    2   udp   2049  nfs
100003    3   udp   2049  nfs
100003    2   tcp   2049  nfs
100003    3   tcp   2049  nfs
100005    1   udp    836  mountd
100005    1   tcp    839  mountd
100005    2   udp    836  mountd
100005    2   tcp    839  mountd
100005    3   udp    836  mountd
100005    3   tcp    839  mountd
If one of the NFS services does not start up correctly,
rpcbind will be unable to map RPC requests from clients for that service to the correct port. In many cases, if NFS is not present in
rpcinfo output, restarting NFS causes the service to correctly register with
rpcbind and begin working. For instructions on starting NFS, refer to
Section 10.5, “Starting and Stopping NFS”.
For more information and a list of options on rpcinfo, refer to its man page.
The default transport protocol for NFS is TCP; however, the Red Hat
Enterprise Linux kernel includes support for NFS over UDP. To use NFS
over UDP, include the mount option -o udp
when mounting the NFS-exported file system on the client system. Note
that NFSv4 on UDP is not standards-compliant, since UDP does not feature
congestion control; as such, NFSv4 on UDP is not supported.
There are three ways to configure an NFS file system export:
On demand via the command line (client side)
Automatically via the /etc/fstab file (client side)
Automatically via autofs configuration files, such as /etc/auto.master and /etc/auto.misc (server side with NIS)
For example, on demand via the command line (client side):
mount -o udp shadowman.example.com:/misc/export /misc/local
When the NFS mount is specified in /etc/fstab (client side):
server:/usr/local/pub /pub nfs rsize=8192,wsize=8192,timeo=14,intr,udp
When the NFS mount is specified in an autofs configuration file for a NIS server, available for NIS enabled workstations:
myproject -rw,soft,intr,rsize=8192,wsize=8192,udp penguin.example.net:/proj52
Since the default is TCP, if the -o udp option is not specified, the NFS-exported file system is accessed via TCP.
The advantages of using TCP include the following:
UDP only acknowledges packet completion, while TCP acknowledges
every packet. This results in a performance gain on heavily-loaded
networks that use TCP when mounting shares.
TCP has better congestion control than UDP. On a very congested
network, UDP packets are the first packets that are dropped. This means
that if NFS is writing data (in 8K chunks) all of that 8K must be
retransmitted over UDP. Because of TCP's reliability, only parts of that
8K data are transmitted at a time.
TCP also has better error detection. When a TCP connection breaks
(due to the server being unavailable) the client stops sending data and
restarts the connection process once the server becomes available. since
UDP is connectionless, the client continues to pound the network with
data until the server re-establishes a connection.
The main disadvantage with TCP is that there is a very small
performance hit due to the overhead associated with the protocol.
Administering an NFS server can be a challenge. Many options,
including quite a few not mentioned in this chapter, are available for
exporting or mounting NFS shares. Consult the following sources for more
information.
/usr/share/doc/nfs-utils-version/
— This directory contains a wealth of information about the NFS
implementation for Linux, including a look at various NFS configurations
and their impact on file transfer performance.
man mount — Contains a comprehensive look at mount options for both NFS server and client configurations.
man fstab — Gives details for the format of the /etc/fstab file used to mount file systems at boot-time.
man nfs — Provides details on NFS-specific file system export and mount options.
man exports — Shows common options used in the /etc/exports file when exporting NFS file systems.
FS-Cache is a persistent local cache that can be used by file systems
to take data retrieved from over the network and cache it on local disk.
This helps minimize network traffic for users accessing data from a
file system mounted over the network (for example, NFS).
The following diagram is a high-level illustration of how FS-Cache works:
Figure 11.1. FS-Cache Overview
FS-Cache is designed to be as transparent as possible to the users and administrators of a system. Unlike cachefs
on Solaris, FS-Cache allows a file system on a server to interact
directly with a client's local cache without creating an overmounted
file system. With NFS, a mount option instructs the client to mount the
NFS share with FS-cache enabled.
FS-Cache does not alter the basic operation of a file system that
works over the network - it merely provides that file system with a
persistent place in which it can cache data. For instance, a client can
still mount an NFS share whether or not FS-Cache is enabled. In
addition, cached NFS can handle files that won't fit into the cache
(whether individually or collectively) as files can be partially cached
and do not have to be read completely up front. FS-Cache also hides all
I/O errors that occur in the cache from the client file system driver.
To provide caching services, FS-Cache needs a cache back-end. A cache back-end is a storage driver configured to provide caching services (i.e. cachefiles). In this case, FS-Cache requires a mounted block-based file system that can supports bmap and extended attributes (e.g. ext3) as its cache back-end.
FS-Cache cannot arbitrarily cache any file system, whether through the
network or otherwise: the shared file system's driver must be altered
to allow interaction with FS-Cache, data storage/retrieval, and metadata
setup and validation. FS-Cache needs indexing keys and coherency data
from the cached file system to support persistence: indexing keys to
match file system objects to cache objects, and coherency data to
determine whether the cache objects are still valid.
11.1. Performance Guarantee
FS-Cache does not guarantee
increased performance. Rather, using a cache back-end incurs a
performance penalty: for example, cached NFS shares add disk accesses to
cross-network lookups. While FS-Cache tries to be as asynchronous as
possible, there are synchronous paths (e.g. reads) where this isn't
possible.
For example, using FS-Cache to cache an NFS share between two
computers over an otherwise unladen GigE network will not demonstrate
any performance improvements on file access. Rather, NFS requests would
be satisfied faster from server memory rather than from local disk.
The use of FS-Cache, therefore, is a compromise
between various factors. If FS-Cache is being used to cache NFS
traffic, for instance, it may slow the client down a little, but
massively reduce the network and server loading by satisfying read
requests locally without consuming network bandwidth.
Currently, Red Hat Enterprise Linux 6 only provides the cachefiles caching back-end. The cachefilesd daemon initiates and manages cachefiles. The /etc/cachefilesd.conf file controls how cachefiles provides caching services. To configure a cache back-end of this type, the cachefilesd package must be installed.
The first setting to configure in a cache back-end is which directory
to use as a cache. To configure this, use the following parameter:
dir /path/to/cache
Typically, the cache back-end directory is set in /etc/cachefilesd.conf as /var/cache/fscache, as in:
dir /var/cache/fscache
FS-Cache will store the cache in the file system that hosts /path/to/cache/)
as the host file system, but for a desktop machine it would be more
prudent to mount a disk partition specifically for the cache.
File systems that support functionalities required by FS-Cache cache
back-end include the Red Hat Enterprise Linux 6 implementations of the
following file systems:
The host file system must support user-defined extended attributes;
FS-Cache uses these attributes to store coherency maintenance
information. To enable user-defined extended attributes for ext3 file
systems (i.e. device
tune2fs -o user_xattr /dev/device
Alternatively, extended attributes for a file system can be enabled at mount time, as in:
mount /dev/device /path/to/cache -o user_xattr
The cache back-end works by maintaining a certain amount of free
space on the partition hosting the cache. It grows and shrinks the cache
in response to other elements of the system using up free space, making
it safe to use on the root file system (for example, on a laptop).
FS-Cache sets defaults on this behavior, which can be configured via
cache cull limits. For more information about configuring cache cull limits, refer to
Section 11.4, “Setting Cache Cull Limits”.
Once the configuration file is in place, start up the cachefilesd daemon:
service cachefilesd start
To configure cachefilesd to start at boot time, execute the following command as root:
chkconfig cachefilesd on
11.3. Using the Cache With NFS
NFS will not use the cache unless explicitly instructed. To configure an NFS mount to use FS-Cache, include the -o fsc option to the mount command, as in:
mount nfs-share:/ /mount/point -o fsc
All access to files under
/mount/point will go through the cache, unless the file is opened for direct I/O or writing (refer to
Section 11.3.2, “Cache Limitations With NFS” for more information). NFS indexes cache contents using NFS file handle,
not the file name; this means that hard-linked files share the cache correctly.
Caching is supported in version 2, 3, and 4 of NFS. However, each version uses different branches for caching.
There are several potential issues to do with NFS cache sharing.
Because the cache is persistent, blocks of data in the cache are indexed
on a sequence of four keys:
To avoid coherency management problems between superblocks, all NFS
superblocks that wish to cache data have unique Level 2 keys. Normally,
two NFS mounts with same source volume and options will share a
superblock, and thus share the caching, even if they mount different
directories within that volume. Take the following two mount commands:
mount home0:/disk0/fred /home/fred -o fsc
mount home0:/disk0/jim /home/jim -o fsc
Here, /home/fred and /home/jim
will likely share the superblock as they have the same options,
especially if they come from the same volume/partition on the NFS server
(home0). Now, consider the next two subsequent mount commands:
mount home0:/disk0/fred /home/fred -o fsc,rsize=230
mount home0:/disk0/jim /home/jim -o fsc,rsize=231
In this case, /home/fred and /home/jim
will not share the superblock as they have different network access
parameters, which are part of the Level 2 key. The same goes for the
following mount sequence:
mount home0:/disk0/fred /home/fred1 -o fsc,rsize=230
mount home0:/disk0/fred /home/fred2 -o fsc,rsize=231
Here, the contents of the two subtrees (/home/fred1 and /home/fred2) will be cached twice.
Another way to avoid superblock sharing is to suppress it explicitly with the nosharecache parameter. Using the same example:
mount home0:/disk0/fred /home/fred -o nosharecache,fsc
mount home0:/disk0/jim /home/jim -o nosharecache,fsc
However, in this case only one of the superblocks will be permitted
to use cache since there is nothing to distinguish the Level 2 keys of home0:/disk0/fred and home0:/disk0/jim. To address this, add a unique identifier on at least one of the mounts, i.e. fsc=unique-identifier. For example:
mount home0:/disk0/fred /home/fred -o nosharecache,fsc
mount home0:/disk0/jim /home/jim -o nosharecache,fsc=jim
Here, the unique identifier jim will be added to the Level 2 key used in the cache for /home/jim.
11.3.2. Cache Limitations With NFS
Opening a file from a shared file system for direct I/O will
automatically bypass the cache. This is because this type of access must
be direct to the server.
Opening a file from a shared file system for writing will not work
on NFS version 2 and 3. The protocols of these versions do not provide
sufficient coherency management information for the client to detect a
concurrent write to the same file from another client.
As such, opening a file from a shared file system for either direct
I/O or writing will flush the cached copy of the file. FS-Cache will not
cache the file again until it is no longer opened for direct I/O or
writing.
Furthermore, this release of FS-Cache only caches regular NFS files. FS-Cache will not cache directories, symlinks, device files, FIFOs and sockets.
11.4. Setting Cache Cull Limits
The cachefilesd daemon works by caching
remote data from shared file systems to free space on the disk. This
could potentially consume all available free space, which could be bad
if the disk also housed the root partition. To control this, cachefilesd
tries to maintain a certain amount of free space by discarding old
objects (i.e. accessed less recently) from the cache. This behavior is
known as cache culling.
When dealing with file system size, the CacheFiles culling behavior is controlled by three settings in /etc/cachefilesd.conf:
- brun
N%
If the amount of free space rises above N% of total disk capacity, cachefilesd disables culling.
- bcull
N%
If the amount of free space falls below N% of total disk capacity, cachefilesd starts culling.
- bstop
N%
If the amount of free space falls below N%, cachefilesd will no longer allocate disk space until until culling raises the amount of free space above N%.
Some file systems have a limit on the number of files they can
actually support (for example, ext3 can only support up to 32,000
files). This makes it possible for CacheFiles to reach the file system's
maximum number of supported files without triggering bcull or bstop. To address this, cachefilesd also tries to keep the number of files below a file system's limit. This behavior is controlled by the following settings:
- frun
N%
If the number of files the file system can further accommodate falls below N% of its maximum file limit, cachefilesd disables culling. For example, with frun 5%, cachefilesd
will disable culling on an ext3 file system if it can accommodate more
than 1,600 files, or if the number of files falls below 95% of its
limit, i.e. 30,400 files.
- fcull
N%
If the number of files the file system can further accommodate rises above N% of its maximum file limit, cachefilesd starts culling. For example, with fcull 5%, cachefilesd
will start culling on an ext3 file system if it can only accommodate
1,600 more files, or if the number of files exceeds 95% of its limit,
i.e. 30,400 files.
- fstop
N%
If the number of files the file system can further accommodate rises above N% of its maximum file limit, cachefilesd will no longer allocate disk space until culling drops the number of files to below N% of the limit. For example, with fstop 5%, cachefilesd will no longer accommodate disk space until culling drops the number of files below 95% of its limit, i.e. 30,400 files.
The default value of N for each setting is as follows:
brun/frun — 10%
bcull/fcull — 7%
bstop/fstop — 3%
When configuring these settings, the following must hold true:
0 <= bstop < bcull < brun < 100
0 <= fstop < fcull < frun < 100
11.5. Statistical Information
FS-Cache also keeps track of general statistical information. To view this information, use:
cat /proc/fs/fscache/stats
FS-Cache statistics includes information on decision points and
object counters. For more details on the statistics provided by
FS-Cache, refer to the following kernel document:
/usr/share/doc/kernel-doc-version/Documentation/filesystems/caching/fscache.txt
For more information on cachefilesd and how to configure it, refer to man cachefilesd and man cachefilesd.conf. The following kernel documents also provide additional information:
/usr/share/doc/cachefilesd-0.5/README
/usr/share/man/man5/cachefilesd.conf.5.gz
/usr/share/man/man8/cachefilesd.8.gz
For general information about FS-Cache, including details on its
design contraints, available statistics, and capabilities, refer to the
following kernel document:
/usr/share/doc/kernel-doc-version/Documentation/filesystems/caching/fscache.txt
Chapter 16. Access Control Lists
Files and directories have permission sets for the owner of the file,
the group associated with the file, and all other users for the system.
However, these permission sets have limitations. For example, different
permissions cannot be configured for different users. Thus, Access Control Lists (ACLs) were implemented.
The Red Hat Enterprise Linux kernel provides ACL support for the ext3
file system and NFS-exported file systems. ACLs are also recognized on
ext3 file systems accessed via Samba.
Along with support in the kernel, the acl package is required to implement ACLs. It contains the utilities used to add, modify, remove, and retrieve ACL information.
The cp and mv commands copy or move any ACLs associated with files and directories.
16.1. Mounting File Systems
Before using ACLs for a file or directory, the partition for the file
or directory must be mounted with ACL support. If it is a local ext3
file system, it can mounted with the following command:
mount -t ext3 -o acl device-name partition
For example:
mount -t ext3 -o acl /dev/VolGroup00/LogVol02 /work
Alternatively, if the partition is listed in the /etc/fstab file, the entry for the partition can include the acl option:
LABEL=/work /work ext3 acl 1 2
If an ext3 file system is accessed via Samba and ACLs have been
enabled for it, the ACLs are recognized because Samba has been compiled
with the --with-acl-support option. No special flags are required when accessing or mounting a Samba share.
By default, if the file system being exported by an NFS server
supports ACLs and the NFS client can read ACLs, ACLs are utilized by the
client system.
To disable ACLs on NFS shares when configuring the server, include the no_acl option in the /etc/exports file. To disable ACLs on an NFS share when mounting it on a client, mount it with the no_acl option via the command line or the /etc/fstab file.
16.2. Setting Access ACLs
There are two types of ACLs: access ACLs and default ACLs.
An access ACL is the access control list for a specific file or
directory. A default ACL can only be associated with a directory; if a
file within the directory does not have an access ACL, it uses the rules
of the default ACL for the directory. Default ACLs are optional.
ACLs can be configured:
Per user
Per group
Via the effective rights mask
For users not in the user group for the file
The setfacl utility sets ACLs for files and directories. Use the -m option to add or modify the ACL of a file or directory:
setfacl -m rules files
Rules (rules) must be
specified in the following formats. Multiple rules can be specified in
the same command if they are separated by commas.
u:uid:perms
Sets the access ACL for a user. The user name or UID may be specified. The user may be any valid user on the system.
g:gid:perms
Sets the access ACL for a group. The group name or GID may be specified. The group may be any valid group on the system.
m:perms
Sets the effective rights mask. The mask is the union of all
permissions of the owning group and all of the user and group entries.
o:perms
Sets the access ACL for users other than the ones in the group for the file.
Permissions (perms) must be a combination of the characters r, w, and x for read, write, and execute.
If a file or directory already has an ACL, and the setfacl command is used, the additional rules are added to the existing ACL or the existing rule is modified.
For example, to give read and write permissions to user andrius:
setfacl -m u:andrius:rw /project/somefile
To remove all the permissions for a user, group, or others, use the -x option and do not specify any permissions:
setfacl -x rules files
For example, to remove all permissions from the user with UID 500:
setfacl -x u:500 /project/somefile
16.3. Setting Default ACLs
To set a default ACL, add d: before the rule and specify a directory instead of a file name.
For example, to set the default ACL for the /share/ directory to read and execute for users not in the user group (an access ACL for an individual file can override it):
setfacl -m d:o:rx /share
To determine the existing ACLs for a file or directory, use the getfacl command. In the example below, the getfacl is used to determine the existing ACLs for a file.
getfacl home/john/picture.png
The above command returns the following output:
# file: home/john/picture.png
# owner: john
# group: john
user::rw-
group::r--
other::r--
If a directory with a default ACL is specified, the default ACL is also displayed as illustrated below. For example, getfacl home/sales/ will display similar output:
# file: home/sales/
# owner: john
# group: john
user::rw-
user:barryg:r--
group::r--
mask::r--
other::r--
default:user::rwx
default:user:john:rwx
default:group::r-x
default:mask::rwx
default:other::r-x
16.5. Archiving File Systems With ACLs
By default, the dump command now preserves ACLs during a backup operation. When archiving a file or file system with tar, use the --acls option to preserve ACLs. Similarly, when using cp to copy files with ACLs, include the --preserve=mode option to ensure that ACLs are copied across too. In addition, the -a option (equivalent to -dR --preserve=all) of cp
also preserves ACLs during a backup along with other information such
as timestamps, SELinux contexts, and the like. For more information
about dump, tar, or cp, refer to their respective man pages.
The
star utility is similar to the
tar utility in that it can be used to generate archives of files; however, some of its options are different. Refer to
Table 16.1, “Command Line Options for star” for a listing of more commonly used options. For all available options, refer to
man star. The
star package is required to use this utility.
Table 16.1. Command Line Options for star
|
Option
|
Description
|
|---|
-c
|
Creates an archive file.
|
-n
|
Do not extract the files; use in conjunction with -x to show what extracting the files does.
|
-r
|
Replaces files in the archive. The files are written to the end
of the archive file, replacing any files with the same path and file
name.
|
-t
|
Displays the contents of the archive file.
|
-u
|
Updates the archive file. The files are written to the end of the
archive if they do not exist in the archive, or if the files are newer
than the files of the same name in the archive. This option only works
if the archive is a file or an unblocked tape that may backspace.
|
-x
|
Extracts the files from the archive. If used with -U and a file in the archive is older than the corresponding file on the file system, the file is not extracted.
|
-help
|
Displays the most important options.
|
-xhelp
|
Displays the least important options.
|
-/
|
Do not strip leading slashes from file names when extracting the
files from an archive. By default, they are stripped when files are
extracted.
|
-acl
|
When creating or extracting, archives or restores any ACLs associated with the files and directories.
|
16.6. Compatibility with Older Systems
If an ACL has been set on any file on a given file system, that file system has the ext_attr attribute. This attribute can be seen using the following command:
tune2fs -l filesystem-device
A file system that has acquired the ext_attr attribute can be mounted with older kernels, but those kernels do not enforce any ACLs which have been set.
Versions of the e2fsck utility included in version 1.22 and higher of the e2fsprogs package (including the versions in Red Hat Enterprise Linux 2.1 and 4) can check a file system with the ext_attr attribute. Older versions refuse to check it.
Refer to the following man pages for more information.
man acl — Description of ACLs
man getfacl — Discusses how to get file access control lists
man setfacl — Explains how to set file access control lists
man star — Explains more about the star utility and its many options
Chapter 18.
Storage I/O Alignment and Size
Recent enhancements to the SCSI and ATA standards allow storage
devices to incidate their preferred (and in some cases, required) I/O alignment and I/O size.
This information is particularly useful with newer disk drives that
increase the physical sector size from 512 bytes to 4k bytes. This
information may also be beneficial for RAID devices, where the chunk
size and stripe size may impact performance.
The Linux I/O stack has been enhanced to process vendor-provided I/O
alignment and I/O size information, allowing storage management tools (parted, lvm, mkfs.*,
and the like) to optimize data placement and access. If a legacy device
does not export I/O alignment and size data, then storage management
tools in Red Hat Enterprise Linux 6 will conservatively align I/O on a
4k (or larger power of 2) boundary. This will ensure that 4k-sector
devices operate correctly even if they do not indicate any
required/preferred I/O alignment and size.
Red Hat Enterprise Linux 6 supports 4k-sector devices as data disks,
not as boot disks. Boot support for 4k-sector devices is planned for a
later release.
Refer to
Section 18.2, “Userspace Access”
to learn how to determine the information that the operating system
obtained from the device. This data is subsequently used by the storage
management tools to determine data placement.
18.1. Parameters for Storage Access
The operating system uses the following information to determine I/O alignment and size:
- physical_block_size
Smallest internal unit on which the device can operate
- logical_block_size
Used externally to address a location on the device
- alignment_offset
Tthe number of bytes that the beginning of the Linux block device
(partition/MD/LVM device) is offset from the underlying physical
alignment
- minimum_io_size
The device’s preferred minimum unit for random I/O
- optimal_io_size
The device’s preferred unit for streaming I/O
For example, certain 4K sector devices may use a 4K physical_block_size internally but expose a more granular 512-byte logical_block_size
to Linux. This discrepancy introduces potential for misaligned I/O. To
address this, the Red Hat Enterprise Linux 6 I/O stack will attempt to
start all data areas on a naturally-aligned boundary (physical_block_size)
by making sure it accounts for any alignment_offset if the beginning of
the block device is offset from the underlying physical alignment.
Storage vendors can also supply I/O hints about the preferred minimum unit for random I/O (minimum_io_size) and streaming I/O (optimal_io_size) of a device. For example, minimum_io_size and optimal_io_size may correspond to a RAID device's chunk size and stripe size respectively.
Always take care to use properly aligned and sized I/O. This is
especially important for Direct I/O access. Direct I/O should be aligned
on a logical_block_size boundary, and in multiples of the logical_block_size.
With native 4K devices (i.e. logical_block_size is 4K) it is now critical that applications perform direct I/O in multiples of the device's logical_block_size. This means that applications will fail with native 4k devices that perform 512-byte aligned I/O rather than 4k-aligned I/O.
To avoid this, an application should consult the I/O parameters of a
device to ensure it is using the proper I/O alignment and size. As
mentioned earlier, I/O parameters are exposed through the both sysfs and block device ioctl interfaces.
For more details, refer to man libblkid. This man page is provided by the libblkid-devel package.
/sys/block/disk
/sys/block/diskpartition
/sys/block/disk
/sys/block/disk
/sys/block/disk
/sys/block/disk
The kernel will still export these sysfs attributes for "legacy" devices that do not provide I/O parameters information, for example:
alignment_offset:    0
physical_block_size: 512
logical_block_size:  512
minimum_io_size:     512
optimal_io_size:     0
BLKALIGNOFF: alignment_offset
BLKPBSZGET: physical_block_size
BLKSSZGET: logical_block_size
BLKIOMIN: minimum_io_size
BLKIOOPT: optimal_io_size
This section describes I/O standards used by ATA and SCSI devices.
ATA devices must report appropriate information via the IDENTIFY DEVICE command. ATA devices only report I/O parameters for physical_block_size, logical_block_size, and alignment_offset. The additional I/O hints are outside the scope of the ATA Command Set.
I/O parameters support in Red Hat Enterprise Linux 6 requires at least version 3 of the SCSI Primary Commands (SPC-3) protocol. The kernel will only send an extended inquiry (which gains access to the BLOCK LIMITS VPD page) and READ CAPACITY(16) command to devices which claim compliance with SPC-3.
The READ CAPACITY(16) command provides the block sizes and alignment offset:
LOGICAL BLOCK LENGTH IN BYTES is used to derive /sys/block/disk/queue/physical_block_size
LOGICAL BLOCKS PER PHYSICAL BLOCK EXPONENT is used to derive /sys/block/disk/queue/logical_block_size
LOWEST ALIGNED LOGICAL BLOCK ADDRESS is used to derive:
The BLOCK LIMITS VPD page (0xb0) provides the I/O hints. It also uses OPTIMAL TRANSFER LENGTH GRANULARITY and OPTIMAL TRANSFER LENGTH to derive:
The sg3_utils package provides the sg_inq utility, which can be used to access the BLOCK LIMITS VPD page. To do so, run:
sg_inq -p 0xb0 disk
18.4. Stacking I/O Parameters
All layers of the Linux I/O stack have been engineered to propagate
the various I/O parameters up the stack. When a layer consumes an
attribute or aggregates many devices, the layer must expose appropriate
I/O parameters so that upper-layer devices or tools will have an
accurate view of the storage as it transformed. Some practical examples
are:
Only one layer in the I/O stack should adjust for a non-zero alignment_offset; once a layer adjusts accordingly, it will export a device with an alignment_offset of zero.
A striped Device Mapper (DM) device created with LVM must export a minimum_io_size and optimal_io_size relative to the stripe count (number of disks) and user-provided chunk size.
In Red Hat Enterprise Linux 6, Device Mapper and Software Raid (MD)
device drivers can be used to arbitrarily combine devices with different
I/O parameters. The kernel's block layer will attempt to reasonably
combine the I/O parameters of the individual devices. The kernel will
not prevent combining heterogenuous devices; however, be aware of the
risks associated with doing so.
For instance, a 512-byte device and a 4K device may be combined into a single logical DM device, which would have a logical_block_size
of 4K. File systems layered on such a hybrid device assume that 4K will
be written atomically, but in reality it will span 8 logical block
addresses when issued to the 512-byte device. Using a 4K logical_block_size for the higher-level DM device increases potential for a partial write to the 512-byte device if there is a system crash.
If combining the I/O parameters of multiple devices results in a
conflict, the block layer may issue a warning that the device is
susceptible to partial writes and/or is misaligned.
18.5. Logical Volume Manager
LVM provides userspace tools that are used to manage the kernel's DM
devices. LVM will shift the start of the data area (that a given DM
device will use) to account for a non-zero alignment_offset associated with any device managed by LVM. This means logical volumes will be properly aligned (alignment_offset=0).
By default, LVM will adjust for any alignment_offset, but this behavior can be disabled by setting data_alignment_offset_detection to 0 in /etc/lvm/lvm.conf. Disabling this is not recommended.
LVM will also detect the I/O hints for a device. The start of a device's data area will be a multiple of the minimum_io_size or optimal_io_size exposed in sysfs. LVM will use the minimum_io_size if optimal_io_size is undefined (i.e. 0).
By default, LVM will automatically determine these I/O hints, but this behavior can be disabled by setting data_alignment_detection to 0 in /etc/lvm/lvm.conf. Disabling this is not recommended.
Chapter 20.
Solid-State Disk Deployment Guidelines
Solid-state disks (SSD) are storage devices
that use NAND flash chips to persistently store data. This sets them
apart from previous generations of disks, which store data in rotating,
magnetic platters. In an SSD, the access time for data across the full
Logical Block Address (LBA) range is constant; whereas with older disks
that use rotating media, access patterns that span large address ranges
incur seek costs. As such, SSD devices have better latency and
throughput.
Not all SSDs show the same performance profiles, however. In fact,
many of the first generation devices show little or no advantage over
spinning media. Thus, it is important to define classes of solid state
storage to frame further discussion in this section.
SSDs can be divided into three classes, based on throughput:
The first class of SSDs use a PCI-Express connection, which offers
the fastest I/O throughput compared to other classes. This class also
has a very low latency for random access.
The second class uses the traditional SATA connection, and features
fast random access for read and write operations (though not as fast as
SSDs that use PCI-Express connection).
The third class also uses SATA, but the performance of SSDs in this
class do not differ substantially from devices that use 7200rpm
rotational disks.
For all three classes, performance degrades as the number of used
blocks approaches the disk capacity. The degree of performance impact
varies greatly by vendor. However, all devices experience some
degradation.
To address the degradation issue, the ATA specification outlines a new command: TRIM.
This command allows the file system to communicate to the underlying
storage device that a given range of blocks is no longer in use. The SSD
can use this information to free up space internally, using the freed
blocks for wear-leveling.
Enabling TRIM support is most useful when
there is available free space on the file system, but the file system
has already written to most logical blocks on the underlying storage
device. For more information about TRIM, refer to its Data Set Management T13 Specifications from the following link:
Not all solid-state devices in the market support TRIM.
20.1.
Deployment Considerations
Because of the internal layout and operation of SSDs, it is best to partition devices on an internal erase block boundary.
Partitioning utilities in Red Hat Enterprise Linux 6 chooses sane
defaults if the SSD exports topology information. This is especially
true if the exported topology information includes alignment offsets and
optimal I/O sizes.
However, if the device does not export topology information, Red Hat recommends that the first partition be created at a 1MB boundary.
In addition, keep in mind that logical volumes, device-mapper targets, and md targets do not support TRIM. As such, the default Red Hat Enterprise Linux 6 installation will not allow the use of the TRIM command, since this install uses DM-linear targets.
Red Hat also warns that software RAID levels 1, 4, 5, and 6 are not
recommended for use on SSDs. During the initialization stage of these
RAID levels, some RAID management utilities (such as mdadm) write to all
of the blocks on the storage device to ensure that checksums operate
properly. This will cause the performance of the SSD to degrade quickly.
At present, ext4 is the only fully-supported file system that supports TRIM. To enable TRIM commands on a device, use the mount option discard. For example, to mount /dev/sda2 to /mnt with TRIM enabled, run:
mount -t ext4 -o discard /dev/sda2 /mnt
By default, ext4 does not issue the TRIM command. This is mostly to avoid problems on devices which may not properly implement the TRIM command. The Linux swap code will issue TRIM commands to TRIM-enabled devices, and there is no option to control this behaviour.
20.2. Tuning Considerations
This section describes several factors to consider when configuring settings that may affect SSD performance.
Any I/O scheduler should perform well with most SSDs. However, as
with any other storage type, Red Hat recommends benchmarking to
determine the optimal configuration for a given workload.
When using SSDs, Red Hat advises changing the I/O scheduler only for
benchmarking particular workloads. For more information about the
different types of I/O schedulers, refer to the I/O Tuning Guide (also provided by Red Hat). The following kernel document also contains instructions on how to switch between I/O schedulers:
/usr/share/doc/kernel-version/Documentation/block/switching-sched.txt
Like the I/O scheduler, virtual memory (VM) subsystem requires no
special tuning. Given the fast nature of I/O on SSD, it should be
possible to turn down the vm_dirty_background_ratio and vm_dirty_ratio
settings, as increased write-out activity should not negatively impact
the latency of other operations on the disk. However, this can generate more overall I/O and so is not generally recommended without workload-specific testing.
An SSD can also be used as a swap device, and is likely to produce good page-out/page-in performance.
Chapter 21.
Online Storage Management
It is often desirable to add, remove or re-size storage devices while
the operating system is running, and without rebooting. This chapter
outlines the procedures that may be used to reconfigure storage devices
on Red Hat Enterprise Linux 6 host systems while the system is running.
It covers iSCSI and Fibre Channel storage interconnects; other
interconnect types may be added it the future.
This chapter focuses on adding, removing, modifying, and monitoring
storage devices. It does not discuss the Fibre Channel or iSCSI
protocols in detail. For more information about these protocols, refer
to other documentation.
This chapter makes reference to various sysfs objects. Red Hat advises that the sysfs
object names and directory structure are subject to change in major Red
Hat Enterprise Linux releases. This is because the upstream Linux
kernel does not provide a stable internal API. For guidelines on how to
reference sysfs objects in a transportable way, refer to the document /usr/share/doc/kernel-doc-version/Documentation/sysfs-rules.txt in the kernel source tree for guidelines.
Online storage reconfiguration must be done carefully. System
failures or interruptions during the process can lead to unexpected
results. Red Hat advises that you reduce system load to the maximum
extent possible during the change operations. This will reduce the
chance of I/O errors, out-of-memory errors, or similar errors occurring
in the midst of a configuration change. The following sections provide
more specific guidelines regarding this.
In addition, Red Hat recommends that you back up all data before reconfiguring online storage.
This section discusses the Fibre Channel API, native Red Hat
Enterprise Linux 6 Fibre Channel drivers, and the Fibre Channel
capabilities of these drivers.
21.1.1. Fibre Channel API
Below is a list of /sys/class/ directories that contain files used to provide the userspace API. In each item, host numbers are designated by HBTLR
If your system is using multipath software, Red Hat recommends that
you consult your hardware vendor before changing any of the values
described in this section.
- Transport:
/sys/class/fc_transport/targetH:B:T/
port_id — 24-bit port ID/address
node_name — 64-bit node name
port_name — 64-bit port name
- Remote Port:
/sys/class/fc_remote_ports/rport-H:B-R/
port_id
node_name
port_name
dev_loss_tmo — number of seconds to
wait before marking a link as "bad". Once a link is marked bad, I/O
running on its corresponding path (along with any new I/O on that path)
will be failed.
The default dev_loss_tmo value
varies, depending on which driver/device is used. If a Qlogic adapter is
used, the default is 35 seconds, while if an Emulex adapter is used, it
is 30 seconds. The dev_loss_tmo value can be changed via the scsi_transport_fc module parameter dev_loss_tmo, although the driver can override this timeout value.
The maximum dev_loss_tmo value is 600 seconds. If dev_loss_tmo is set to zero or any value greater than 600, the driver's internal timeouts will be used instead.
fast_io_fail_tmo — length of time
to wait before failing I/O executed when a link problem is detected. I/O
that reaches the driver will fail. If I/O is in a blocked queue, it
will not be failed until dev_loss_tmo expires and the queue is unblocked.
- Host:
/sys/class/fc_host/hostH/
21.1.2. Native Fibre Channel Drivers and Capabilities
Red Hat Enterprise Linux 6 ships with the following native fibre channel drivers:
Table 21.1. Fibre-Channel API Capabilities
|
|
lpfc
|
qla2xxx
|
zfcp
|
mptfc
|
|---|
Transport port_id
|
X
|
X
|
X
|
X
|
Transport node_name
|
X
|
X
|
X
|
X
|
Transport port_name
|
X
|
X
|
X
|
X
|
Remote Port dev_loss_tmo
|
X
|
X
|
X
|
X
|
Remote Port fast_io_fail_tmo
|
X
|
X []
|
X []
|
|
Host port_id
|
X
|
X
|
X
|
X
|
Host issue_lip
|
X
|
X
|
|
|
This section describes the iSCSI API and the iscsiadm utility. Before using the iscsiadm utility, install the iscsi-initiator-utils package first; to do so, run yum install iscsi-initiator-utils.
In addition, the iSCSI service must be running in order to discover or log in to targets. To start the iSCSI service, run service iscsi start
To get information about running sessions, run:
iscsiadm -m session -P 3
This command displays the session/device state, session ID (sid), some
negotiated parameters, and the SCSI devices accessible through the
session.
For shorter output (for example, to display only the sid-to-node mapping), run:
iscsiadm -m session -P 0
or
iscsiadm -m session
These commands print the list of running sessions with the format:
driver [sid] target_ip:port,target_portal_group_tag proper_target_name
For example:
iscsiadm -m session
tcp [2] 10.15.84.19:3260,2 iqn.1992-08.com.netapp:sn.33615311
tcp [3] 10.15.85.19:3260,3 iqn.1992-08.com.netapp:sn.33615311
For more information about the iSCSI API, refer to /usr/share/doc/iscsi-initiator-utils-version/README.
The operating system issues I/O to a storage device by referencing the
path that is used to reach it. For SCSI devices, the path consists of
the following:
PCI identifier of the host bus adapter (HBA)
channel number on that HBA
the remote SCSI target address
the Logical Unit Number (LUN)
This path-based address is not persistent. It may change any time the
system is reconfigured (either by on-line reconfiguration, as described
in this manual, or when the system is shutdown, reconfigured, and
rebooted). It is even possible for the path identifiers to change when
no physical reconfiguration has been done, as a result of timing
variations during the discovery process when the system boots, or when a
bus is re-scanned.
The operating system provides several non-persistent names to represent these access paths to storage devices. One is the /dev/sd name; another is the major:minor number. A third is a symlink maintained in the /dev/disk/by-path/ directory. This symlink maps from the path identifier to the current /dev/sd name. For example, for a Fibre Channel device, the PCI info and Host:BusTarget:LUN
pci-0000:02:0e.0-scsi-0:0:0:0 -> ../../sda
For iSCSI devices, by-path/ names map from the target name and portal information to the sd name.
It is generally not appropriate
for applications to use these path-based names. This is because the
storage device these paths reference may change, potentially causing
incorrect data to be written to the device. Path-based names are also
not appropriate for multipath devices, because the path-based names may
be mistaken for separate storage devices, leading to uncoordinated
access and unintended modifications of the data.
In addition, path-based names are system-specific. This can cause
unintended data changes when the device is accessed by multiple systems,
such as in a cluster.
For these reasons, several persistent, system-independent, methods for
identifying devices have been developed. The following sections discuss
these in detail.
The World Wide Identifier (WWID) can be
used in reliably identifying devices. It is a persistent,
system-independent ID that the SCSI Standard requires from all SCSI
devices. The WWID identifier is guaranteed to be unique for every
storage device, and independent of the path that is used to access the
device.
This identifier can be obtained by issuing a SCSI Inquiry to retrieve the Device Identification Vital Product Data (page 0x83) or Unit Serial Number (page 0x80). The mappings from these WWIDs to the current /dev/sd names can be seen in the symlinks maintained in the /dev/disk/by-id/ directory.
For example, a device with a page 0x83 identifier would have:
scsi-3600508b400105e210000900000490000 -> ../../sda
Or, a device with a page 0x80 identifier would have:
scsi-SSEAGATE_ST373453LW_3HW1RHM6 -> ../../sda
Red Hat Enterprise Linux automatically maintains the proper mapping from the WWID-based device name to a current /dev/sd name on that system. Applications can use the /dev/disk/by-id/
name to reference the data on the disk, even if the path to the device
changes, and even when accessing the device from different systems.
If there are multiple paths from a system to a device, device-mapper-multipath uses the WWID to detect this. Device-mapper-multipath then presents a single "pseudo-device" in /dev/mapper/wwid, such as /dev/mapper/3600508b400105df70000e00000ac0000.
The command multipath -l shows the mapping to the non-persistent identifiers: Host:Channel:Target:LUN/dev/sd name, and the major:minor number.
3600508b400105df70000e00000ac0000 dm-2 vendor,product
[size=20G][features=1 queue_if_no_path][hwhandler=0][rw]
\_ round-robin 0 [prio=0][active]
 \_ 5:0:1:1 sdc 8:32  [active][undef]
 \_ 6:0:1:1 sdg 8:96  [active][undef]
\_ round-robin 0 [prio=0][enabled]
 \_ 5:0:0:1 sdb 8:16  [active][undef]
 \_ 6:0:0:1 sdf 8:80  [active][undef]
Device-mapper-multipath automatically maintains the proper mapping of each WWID-based device name to its corresponding /dev/sd
name on the system. These names are persistent across path changes, and
they are consistent when accessing the device from different systems.
When the user_friendly_names feature (of device-mapper-multipath) is used, the WWID is mapped to a name of the form /dev/mapper/mpathn. By default, this mapping is maintained in the file /var/lib/multipath/bindings. These mpathn names are persistent as long as that file is maintained.
The multipath bindings file (by default,
/var/lib/multipath/bindings) must be available at boot time. If
/var is a separate file system from
/, then you must change the default location of the file. For more information, refer to
http://kbase.redhat.com/faq/docs/DOC-17650.
In addition to these persistent names provided by the system, you can also use
udev rules to implement persistent names of your own, mapped to the WWID of the storage. For more information about this, refer to
http://kbase.redhat.com/faq/docs/DOC-7319.
21.3.2. UUID and Other Persistent Identifiers
If a storage device contains a file system, then that file system may provide one or both of the following:
These identifiers are persistent, and based on metadata written on
the device by certain applications. They may also be used to access the
device using the symlinks maintained by the operating system in the /dev/disk/by-label/ (e.g. boot -> ../../sda1 ) and /dev/disk/by-uuid/ (e.g. f8bf09e3-4c16-4d91-bd5e-6f62da165c08 -> ../../sda1) directories.
md and LVM write metadata on the storage
device, and read that data when they scan devices. In each case, the
metadata contains a UUID, so that the device can be identified
regardless of the path (or system) used to access it. As a result, the
device names presented by these facilities are persistent, as long as
the metadata remains unchanged.
21.4. Removing a Storage Device
Before removing access to the storage device itself, it is advisable
to back up data from the device first. Afterwards, flush I/O and remove
all operating system references to the device (as described below). If
the device uses multipathing, then do this for the multipath "pseudo
device" (
Section 21.3.1, “WWID”)
and each of the identifiers that represent a path to the device. If you
are only removing a path to a multipath device, and other paths will
remain, then the procedure is simpler, as described in
Section 21.6, “Adding a Storage Device or Path”.
Removal of a storage device is not recommended when the system is
under memory pressure, since the I/O flush will add to the load. To
determine the level of memory pressure, run the command vmstat 1 100; device removal is not recommended if:
Free memory is less than 5% of the total memory in more than 10 samples per 100 (the command free can also be used to display the total memory).
Swapping is active (non-zero si and so columns in the vmstat output).
The general procedure for removing all access to a device is as follows:
Procedure 21.1. Ensuring a Clean Device Removal
Close all users of the device and backup device data as needed.
Use umount to unmount any file systems that mounted the device.
Remove the device from any md and LVM
volume using it. If the device is a member of an LVM Volume group, then
it may be necessary to move data off the device using the pvmove command, then use the vgreduce command to remove the physical volume, and (optionally) pvremove to remove the LVM metadata from the disk.
If the device uses multipathing, run multipath -l and note all the paths to the device. Afterwards, remove the multipathed device using multipath -f device.
Run blockdev –flushbufs device to flush any outstanding I/O to all paths to the device. This is particularly important for raw devices, where there is no umount or vgreduce operation to cause an I/O flush.
Remove any reference to the device's path-based name, like /dev/sd, /dev/disk/by-path or the major:minor
number, in applications, scripts, or utilities on the system. This is
important in ensuring that different devices added in the future will
not be mistaken for the current device.
Finally, remove each path to the device from the SCSI subsystem. To do so, use the command echo 1 > /sys/block/device-name/device/delete where device-namesde, for example.
Another variation of this operation is echo 1 > /sys/class/scsi_device/h:c:t:l/device/delete, where hctl
The older form of these commands, echo "scsi remove-single-device 0 0 0 0" > /proc/scsi/scsi, is deprecated.
You can determine the device-namelsscsi, scsi_id, multipath -l, and ls -l /dev/disk/by-*.
Other procedures, such as the physical removal of the device, followed by a rescan of the SCSI bus (as described in
Section 21.9, “Scanning Storage Interconnects”)
to cause the operating system state to be updated to reflect the
change, are not recommended. This will cause delays due to I/O timeouts,
and devices may be removed unexpectedly. If it is necessary to perform a
rescan of an interconnect, it must be done while I/O is paused, as
described in
Section 21.9, “Scanning Storage Interconnects”.
21.5. Removing a Path to a Storage Device
If you are removing a path to a device that uses multipathing (without
affecting other paths to the device), then the general procedure is as
follows:
Procedure 21.2. Removing a Path to a Storage Device
Remove any reference to the device's path-based name, like /dev/sd or /dev/disk/by-path or the major:minor
number, in applications, scripts, or utilities on the system. This is
important in ensuring that different devices added in the future will
not be mistaken for the current device.
Take the path offline using echo offline > /sys/block/sda/device/state.
This will cause any subsequent I/O sent to the device on this path to be failed immediately. Device-mapper-multipath will continue to use the remaining paths to the device.
After performing
Procedure 21.2, “Removing a Path to a Storage Device”, the path can be safely removed from the running system. It is not necessary to stop I/O while this is done, as
device-mapper-multipath will re-route I/O to remaining paths according to the configured path grouping and failover policies.
Other procedures, such as the physical removal of the cable, followed
by a rescan of the SCSI bus to cause the operating system state to be
updated to reflect the change, are not recommended. This will cause
delays due to I/O timeouts, and devices may be removed unexpectedly. If
it is necessary to perform a rescan of an interconnect, it must be done
while I/O is paused, as described in
Section 21.9, “Scanning Storage Interconnects”.
21.6. Adding a Storage Device or Path
When adding a device, be aware that the path-based device name (/dev/sd name, major:minor number, and /dev/disk/by-path
name, for example) the system assigns to the new device may have been
previously in use by a device that has since been removed. As such,
ensure that all old references to the path-based device name have been
removed. Otherwise, the new device may be mistaken for the old device.
The first step in adding a storage device or path is to physically
enable access to the new storage device, or a new path to an existing
device. This is done using vendor-specific commands at the Fibre Channel
or iSCSI storage server. When doing so, note the LUN value for the new
storage that will be presented to your host. If the storage server is
Fibre Channel, also take note of the World Wide Node Name
(WWNN) of the storage server, and determine whether there is a single
WWNN for all ports on the storage server. If this is not the case, note
the World Wide Port Name (WWPN) for each port that will be used to access the new LUN.
Next, make the operating system aware of the new storage device, or
path to an existing device. The recommended command to use is:
echo "c t l" > /sys/class/scsi_host/hosth/scan
In the previous command, hctl
The older form of this command, echo "scsi add-single-device 0 0 0 0" > /proc/scsi/scsi, is deprecated.
For Fibre Channel storage servers that implement a single WWNN for all ports, you can determine the correct hctsysfs. For example, if the WWNN of the storage server is 0x5006016090203181, use:
grep 5006016090203181 /sys/class/fc_transport/*/node_name
This should display output similar to the following:
/sys/class/fc_transport/target5:0:2/node_name:0x5006016090203181
/sys/class/fc_transport/target5:0:3/node_name:0x5006016090203181
/sys/class/fc_transport/target6:0:2/node_name:0x5006016090203181
/sys/class/fc_transport/target6:0:3/node_name:0x5006016090203181
This indicates there are four Fibre Channel routes to this target (two
single-channel HBAs, each leading to two storage ports). Assuming a LUN
value is 56, then the following command will configure the first path:
echo "0 2 56" > /sys/class/scsi_host/host5/scan
This must be done for each path to the new device.
For Fibre Channel storage servers that do not implement a single WWNN
for all ports, you can determine the correct HBA number, HBA channel,
and SCSI target ID by searching for each of the WWPNs in sysfs.
Another way to determine the HBA number, HBA channel, and SCSI target
ID is to refer to another device that is already configured on the same
path as the new device. This can be done with various commands, such as lsscsi, scsi_id, multipath -l, and ls -l /dev/disk/by-*.
This information, plus the LUN number of the new device, can be used as
shown above to probe and configure that path to the new device.
After adding all the SCSI paths to the device, execute the multipath command, and check to see that the device has been properly configured. At this point, the device can be added to md, LVM, mkfs, or mount, for example.
If the steps above are followed, then a device can safely be added to a
running system. It is not necessary to stop I/O to other devices while
this is done. Other procedures involving a rescan (or a reset) of the
SCSI bus, which cause the operating system to update its state to
reflect the current device connectivity, are not recommended while
storage I/O is in progress.
21.7.
Configuring a Fibre-Channel Over Ethernet Interface
Setting up and deploying a Fibre-channel over ethernet (FCoE) interface requires two packages:
Once these packages are installed, perform the following procedure to enable FCoE over a virtual LAN (VLAN):
Procedure 21.3. Configuring an ethernet interface to use FCoE
Configure a new VLAN by copying an existing network script (e.g. /etc/fcoe/cfg-eth0)
to the name of the ethernet device that supports FCoE. This will
provide you with a default file to configure. Given that the FCoE device
is ethX, run:
cp /etc/fcoe/cfg-eth0 /etc/fcoe/cfg-ethX
If you want the device to automatically load during boot time, set ONBOOT=yes in the corresponding /etc/sysconfig/network-scripts/ifcfg-ethX file. For example, if the FCoE device is eth2, then edit /etc/sysconfig/network-scripts/ifcfg-eth2 accordingly.
Start the data center bridging daemon (dcbd) using the following command:
/etc/init.d/lldpad start
Enable data center bridging on the ethernet interface using the following commands:
dcbtool sc ethX dcb on
Then, enable FCoE on the ethernet interface by running:
dcbtool sc ethX app:fcoe e:1
These commands will only work if the dcbd settings for the ethernet interface were not changed.
Load the FCoE device now using:
ifconfig ethX up
Start FCoE using:
/etc/init.d/fcoe start
The FCoE device should appear shortly, assuming all other settings
on the fabric are correct. To view configured FCoE devices, run:
fcoeadmin -i
After correctly configuring the ethernet interface to use FCoE, Red Hat recommends that you set FCoE and lldpad to run at startup. To do so, use chkconfig, as in:
chkconfig lldpad on
chkconfig fcoe on
Do not run software-based DCB or LLDP on CNAs that implement DCB.
Some Combined Network Adapters (CNAs) implement the Data Center
Bridging (DCB) protocol in firmware. The DCB protocol assumes that there
is just one originator of DCB on a particular network link. This means
that any higher-level software implementation of DCB, or Link Layer
Discovery Protocol (LLDP), must be disabled on CNAs that implement DCB.
21.8. Configuring an FCoE Interface to Automatically Mount at Boot
The instructions in this section are available in /usr/share/doc/fcoe-utils-version/README as of Red Hat Enterprise Linux 6.1. Please refer to that document for any possible changes throughout minor releases.
You can mount newly discovered disks via udev rules, autofs,
and other similar methods. Sometimes, however, a specific service might
require the FCoE disk to be mounted at boot-time. In such cases, the
FCoE disk should be mounted as soon as the fcoe service runs and before the initiation of any service that requires the FCoE disk.
To configure an FCoE disk to automatically mount at boot, add proper FCoE mounting code to the startup script for the fcoe service. The fcoe startup script is /etc/init.d/fcoe.
The FCoE mounting code is different per system configuration, whether
you are using a simple formatted FCoE disk, LVM, or multipathed device
node. The following is a sample FCoE mounting code for mounting file
systems specified via wild cards in /etc/fstab:
mount_fcoe_disks_from_fstab()
	{
	    local timeout=20
	    local done=1
	    local fcoe_disks=($(egrep 'by-path\/fc-.*_netdev' /etc/fstab | cut -d ' ' -f1))

	    test -z $fcoe_disks && return 0

	    echo -n "Waiting for fcoe disks . "
	    while [ $timeout -gt 0 ]; do
		for disk in ${fcoe_disks[*]}; do
			if ! test -b $disk; then
				done=0
				break
			fi
		done

		test $done -eq 1 && break;
		sleep 1
		echo -n ". "
		done=1
		let timeout--
	    done

	    if test $timeout -eq 0; then
		echo "timeout!"
	    else
		echo "done!"
	    fi

	    # mount any newly discovered disk
	    mount -a 2>/dev/null
	}
The mount_fcoe_disks_from_fstab function should be invoked after the fcoe service script starts the fcoemon daemon. This will mount FCoE disks specified by the following paths in /etc/fstab:
/dev/disk/by-path/fc-0xXX:0xXX /mnt/fcoe-disk1 ext3  defaults,_netdev    0 0
/dev/disk/by-path/fc-0xYY:0xYY /mnt/fcoe-disk2 ext3  defaults,_netdev    0 0
Entries with fc- and _netdev sub-strings enable the mount_fcoe_disks_from_fstab function to identify FCoE disk mount entries. For more information on /etc/fstab entries, refer to man 5 fstab.
The fcoe service does not implement a
timeout for FCoE disk discovery. As such, the FCoE mounting code should
implement its own timeout period.
21.9. Scanning Storage Interconnects
There are several commands available that allow you to reset and/or
scan one or more interconnects, potentially adding and removing multiple
devices in one operation. This type of scan can be disruptive, as it
can cause delays while I/O operations timeout, and remove devices
unexpectedly. As such, Red Hat recommends that this type of scan be used
only when necessary. In addition, the following restrictions must be observed when scanning storage interconnects:
All I/O on the effected interconnects must be paused and flushed
before executing the procedure, and the results of the scan checked
before I/O is resumed.
As with removing a device, interconnect scanning is not recommended
when the system is under memory pressure. To determine the level of
memory pressure, run the command vmstat 1 100;
interconnect scanning is not recommended if free memory is less than 5%
of the total memory in more than 10 samples per 100. It is also not
recommended if swapping is active (non-zero si and so columns in the vmstat output). The command free can also display the total memory.
The following commands can be used to scan storage interconnects.
echo "1" > /sys/class/fc_host/host/issue_lip
This operation performs a Loop Initialization Protocol (LIP)
and then scans the interconnect and causes the SCSI layer to be updated
to reflect the devices currently on the bus. A LIP is, essentially, a
bus reset, and will cause device addition and removal. This procedure is
necessary to configure a new SCSI target on a Fibre Channel
interconnect.
Bear in mind that issue_lip is an asynchronous operation. The command may complete before the entire scan has completed. You must monitor /var/log/messages to determine when it is done.
/usr/bin/rescan-scsi-bus.sh
This script was included as of Red Hat Enterprise Linux 5.4. By
default, this script scans all the SCSI buses on the system, updating
the SCSI layer to reflect new devices on the bus. The script provides
additional options to allow device removal and the issuing of LIPs. For
more information about this script (including known issues), refer to
Section 21.15, “Adding/Removing a Logical Unit Through rescan-scsi-bus.sh”.
echo "- - -" > /sys/class/scsi_host/hosth/scan
This is the same command described in
Section 21.6, “Adding a Storage Device or Path”
to add a storage device or path. In this case, however, the channel
number, SCSI target ID, and LUN values are replaced by wildcards. Any
combination of identifiers and wildcards is allowed, allowing you to
make the command as specific or broad as needed. This procedure will add
LUNs, but not remove them.
rmmod driver-name or modprobe driver-name
These commands completely re-initialize the state of all
interconnects controlled by the driver. Although this is extreme, it may
be appropriate in some situations. This may be used, for example, to
re-start the driver with a different module parameter value.
21.10.
iSCSI Discovery Configuration
The default iSCSI configuration file is /etc/iscsi/iscsid.conf. This file contains iSCSI settings used by iscsid and iscsiadm.
During target discovery, the iscsiadm tool uses the settings in /etc/iscsi/iscsid.conf to create two types of records:
- Node records in
/var/lib/iscsi/nodes
When logging into a target, iscsiadm uses the settings in this file.
- Discovery records in
/var/lib/iscsi/discovery_type
When performing discovery to the same destination, iscsiadm uses the settings in this file.
Before using different settings for discovery, delete the current discovery records (i.e. /var/lib/iscsi/discovery_type) first. To do this, use the following command:
iscsiadm -m discovery -t discovery_type -p target_IP:port -o delete[]
Here, discovery_typesendtargets, isns, or fw. []
There are two ways to reconfigure discovery record settings:
Edit the /etc/iscsi/iscsid.conf file directly prior to performing a discovery. Discovery settings use the prefix discovery; to view them, run:
iscsiadm -m discovery -t discovery_type -p target_IP:port
Alternatively, iscsiadm can also be used to directly change discovery record settings, as in:
iscsiadm -m discovery -t discovery_type -p target_IP:port -o update -n setting -v %value
Refer to man iscsiadm for more information on available settingvalue
For more information on configuring iSCSI target discovery, refer to the man pages of iscsiadm and iscsid. The /etc/iscsi/iscsid.conf file also contains examples on proper configuration syntax.
21.11.
Configuring iSCSI Offload and Interface Binding
This chapter describes how to set up iSCSI interfaces in order to bind
a session to a NIC port when using software iSCSI. It also describes
how to set up interfaces for use with network devices that support
offloading; namely, devices from Chelsio, Broadcom and ServerEngines.
The network subsystem can be configured to determine the path/NIC that
iSCSI interfaces should use for binding. For example, if portals and
NICs are set up on different subnets, then it is not necessary to
manually configure iSCSI interfaces for binding.
Before attempting to configure an iSCSI interface for binding, run the following command first:
ping -I ethX target_IP[]
If ping fails, then you will not be able to bind a session to a NIC. If this is the case, check the network settings first.
21.11.1.
Viewing Available iface Configurations
Red Hat Enterprise Linux 5.5 supports iSCSI offload and interface binding for the following iSCSI initiator implementations:
Software iSCSI — like the scsi_tcp and ib_iser modules, this stack allocates an iSCSI host instance (i.e. scsi_host) per session, with a single connection per session. As a result, /sys/class_scsi_host and /proc/scsi will report a scsi_host for each connection/session you are logged into.
Offload iSCSI — like the Chelsio cxgb3i, Broadcom bnx2i and ServerEngines be2iscsi modules, this stack allocates a scsi_host for each PCI device. As such, each port on a host bus adapter will show up as a different PCI device, with a different scsi_host per HBA port.
To manage both types of initiator implementations, iscsiadm uses the iface structure. With this structure, an iface configuration must be entered in /var/lib/iscsi/ifaces for each HBA port, software iSCSI, or network device (ethX) used to bind sessions.
To view available iface configurations, run iscsiadm -m iface. This will display iface information in the following format:
iface_name transport_name,hardware_address,ip_address,net_ifacename,initiator_name
Refer to the following table for an explanation of each value/setting.
Table 21.2. iface Settings
|
Setting
|
Description
|
|---|
iface_name
|
iface configuration name.
|
transport_name
|
Name of driver
|
hardware_address
|
MAC address
|
ip_address
|
IP address to use for this port
|
net_iface_name
|
Name used for the vlan or alias binding of a software iSCSI session. For iSCSI offloads, net_iface_name will be <empty> because this value is not persistent across reboots.
|
initiator_name
|
This setting is used to override a default name for the initiator, which is defined in /etc/iscsi/initiatorname.iscsi
|
The following is a sample output of the iscsiadm -m iface command:
iface0 qla4xxx,00:c0:dd:08:63:e8,20.15.0.7,default,iqn.2005-06.com.redhat:madmax
iface1 qla4xxx,00:c0:dd:08:63:ea,20.15.0.9,default,iqn.2005-06.com.redhat:madmax
For software iSCSI, each iface configuration must have a unique name (with less than 65 characters). The iface_name for network devices that support offloading appears in the format transport_name.hardware_name
For example, the sample output of iscsiadm -m iface on a system using a Chelsio network card might appear as:
default tcp,<empty>,<empty>,<empty>,<empty>
iser iser,<empty>,<empty>,<empty>,<empty>
cxgb3i.00:07:43:05:97:07 cxgb3i,00:07:43:05:97:07,<empty>,<empty>,<empty>
It is also possible to display the settings of a specific iface configuration in a more friendly way. To do so, use the option -I iface_name. This will display the settings in the following format:
iface.setting = value
Using the previous example, the iface settings of the same Chelsio video card (i.e. iscsiadm -m iface -I cxgb3i.00:07:43:05:97:07) would appear as:
# BEGIN RECORD 2.0-871
iface.iscsi_ifacename = cxgb3i.00:07:43:05:97:07
iface.net_ifacename = <empty>
iface.ipaddress = <empty>
iface.hwaddress = 00:07:43:05:97:07
iface.transport_name = cxgb3i
iface.initiatorname = <empty>
# END RECORD
21.11.2.
Configuring an iface for Software iSCSI
As mentioned earlier, an iface configuration is required for each network object that will be used to bind a session.
Before
To create an iface configuration for software iSCSI, run the following command:
iscsiadm -m iface -I iface_name --op=new
This will create a new empty iface configuration with a specified iface_nameiface configuration already has the same iface_name
To configure a specific setting of an iface configuration, use the following command:
iscsiadm -m iface -I iface_name --op=update -n iface.setting -v hw_address
For example, to set the MAC address (hardware_address) of iface0 to 00:0F:1F:92:6B:BF, run:
iscsiadm -m iface -I iface0 - -op=update -n iface.hwaddress -v 00:0F:1F:92:6B:BF
Do not use default or iser as iface names. Both strings are special values used by iscsiadm for backward compatibility. Any manually-created iface configurations named default or iser will disable backwards compatibility.
21.11.3.
Configuring an iface for iSCSI Offload
By default, iscsiadm will create an iface configuration for each Chelsio, Broadcom, and ServerEngines port. To view available iface configurations, use the same command for doing so in software iSCSI, i.e. iscsiadm -m iface.
Before using the iface of a network card for iSCSI offload, first set the IP address (target_IPbe2iscsi driver (i.e. ServerEngines iSCSI HBAs), the IP address is configured in the ServerEngines BIOS setup screen.
For Chelsio and Broadcom devices, the procedure for configuring the IP address is the same as for any other iface setting. So to configure the IP address of the iface, use:
iscsiadm -m iface -I iface_name -o update -n iface.ipaddress -v target_IP
For example, to set the iface IP address of a Chelsio card (with iface name cxgb3i.00:07:43:05:97:07) to 20.15.0.66, use:
iscsiadm -m iface -I cxgb3i.00:07:43:05:97:07 -o update -n iface.ipaddress -v 20.15.0.66
21.11.4.
Binding/Unbinding an iface to a Portal
Whenever iscsiadm is used to scan for interconnects, it will first check the iface.transport settings of each iface configuration in /var/lib/iscsi/ifaces. The iscsiadm utility will then bind discovered portals to any iface whose iface.transport is tcp.
This behavior was implemented for compatibility reasons. To override this, use the -I iface_name to specify which portal to bind to an iface, as in:
iscsiadm -m discovery -t st -p target_IP:port -I iface_name -P 1[]
By default, the iscsiadm utility will not automatically bind any portals to iface configurations that use offloading. This is because such iface configurations will not have iface.transport set to tcp. As such, the iface configurations of Chelsio, Broadcom, and ServerEngines ports need to be manually bound to discovered portals.
It is also possible to prevent a portal from binding to any existing iface. To do so, use default as the iface_name
iscsiadm -m discovery -t st -p IP:port -I default -P 1
To remove the binding between a target and iface, use:
iscsiadm -m node -targetname proper_target_name -I iface0 --op=delete[]
To delete all bindings for a specific iface, use:
iscsiadm -m node -I iface_name --op=delete
To delete bindings for a specific portal (e.g. for Equalogic targets), use:
iscsiadm -m node -p IP:port -I iface_name --op=delete
If there are no iface configurations defined in /var/lib/iscsi/iface and the -I option is not used, iscsiadm will allow the network subsystem to decide which device a specific portal should use.
21.12.
Scanning iSCSI Interconnects
For iSCSI, if the targets send an iSCSI async event indicating new storage is added, then the scan is done automatically. Cisco MDS™ and EMC Celerra™ support this feature.
However, if the targets do not send an iSCSI async event, you need to manually scan them using the iscsiadm utility. Before doing so, however, you need to first retrieve the proper --targetname and the --portal values. If your device model supports only a single logical unit and portal per target, use iscsiadm to issue a sendtargets command to the host, as in:
iscsiadm -m discovery -t sendtargets -p target_IP:port[]
The output will appear in the following format:
target_IP:port,target_portal_group_tag proper_target_name
For example, on a target with a proper_target_nameiqn.1992-08.com.netapp:sn.33615311 and a target_IP:port10.15.85.19:3260, the output may appear as:
10.15.84.19:3260,2 iqn.1992-08.com.netapp:sn.33615311
10.15.85.19:3260,3 iqn.1992-08.com.netapp:sn.33615311
In this example, the target has two portals, each using target_ip:port10.15.84.19:3260 and 10.15.85.19:3260.
To see which iface configuration will be used for each session, add the -P 1 option. This option will print also session information in tree format, as in:
    Target: proper_target_name
        Portal: target_IP:port,target_portal_group_tag
           Iface Name: iface_name
For example, with iscsiadm -m discovery -t sendtargets -p 10.15.85.19:3260 -P 1, the output may appear as:
Target: iqn.1992-08.com.netapp:sn.33615311
    Portal: 10.15.84.19:3260,2
       Iface Name: iface2
    Portal: 10.15.85.19:3260,3
       Iface Name: iface2
This means that the target iqn.1992-08.com.netapp:sn.33615311 will use iface2 as its iface configuration.
With some device models (e.g. from EMC and Netapp), however, a single
target may have multiple logical units and/or portals. In this case,
issue a sendtargets command to the host first to find new portals on the target. Then, rescan the existing sessions using:
iscsiadm -m session --rescan
You can also rescan a specific session by specifying the session's SID
iscsiadm -m session -r SID --rescan[]
If your device supports multiple targets, you will need to issue a sendtargets command to the hosts to find new portals for each target. Then, rescan existing sessions to discover new logical units on existing sessions (i.e. using the --rescan option).
The sendtargets command used to retrieve --targetname and --portal values overwrites the contents of the /var/lib/iscsi/nodes database. This database will then be repopulated using the settings in /etc/iscsi/iscsid.conf. However, this will not occur if a session is currently logged in and in use.
To safely add new targets/portals or delete old ones, use the -o new or -o delete options, respectively. For example, to add new targets/portals without overwriting /var/lib/iscsi/nodes, use the following command:
iscsiadm -m discovery -t st -p target_IP -o new
To delete /var/lib/iscsi/nodes entries that the target did not display during discovery, use:
iscsiadm -m discovery -t st -p target_IP -o delete
You can also perform both tasks simultaneously, as in:
iscsiadm -m discovery -t st -p target_IP -o delete -o new
The sendtargets command will yield the following output:
ip:port,target_portal_group_tag proper_target_name
For example, given a device with a single target, logical unit, and portal, with equallogic-iscsi1 as your target_name
10.16.41.155:3260,0 iqn.2001-05.com.equallogic:6-8a0900-ac3fe0101-63aff113e344a4a2-dl585-03-1
Note that
proper_target_name and
ip:port,target_portal_group_tag are identical to the values of the same name in
Section 21.2.1, “iSCSI API”.
At this point, you now have the proper --targetname and --portal values needed to manually scan for iSCSI devices. To do so, run the following command:
iscsiadm --mode node --targetname proper_target_name --portal ip:port,target_portal_group_tag \ --login []
Using our previous example (where proper_target_nameequallogic-iscsi1), the full command would be:
iscsiadm --mode node --targetname \ iqn.2001-05.com.equallogic:6-8a0900-ac3fe0101-63aff113e344a4a2-dl585-03-1 \ --portal 10.16.41.155:3260,0 --login[]
21.13.
Logging In to an iSCSI Target
As mentioned in
Section 21.2, “iSCSI”, the iSCSI service must be running in order to discover or log into targets. To start the iSCSI service, run:
service iscsi start
When this command is executed, the iSCSI init scripts will automatically log into targets where the node.startup setting is configured as automatic. This is the default value of node.startup for all targets.
To prevent automatic login to a target, set node.startup to manual. To do this, run the following command:
iscsiadm -m node --targetname proper_target_name -p target_IP:port -o update -n node.startup -v manual
Deleting the entire record will also prevent automatic login. To do this, run:
iscsiadm -m node --targetname proper_target_name -p target_IP:port -o delete
To automatically mount a file system from an iSCSI device on the network, add a partition entry for the mount in /etc/fstab with the _netdev option. For example, to automatically mount the iSCSI device sdb to /mount/iscsi during startup, add the following line to /etc/fstab:
/dev/sdb /mnt/iscsi ext3 _netdev 0 0
To manually log in to an iSCSI target, use the following command:
iscsiadm -m node --targetname proper_target_name -p target_IP:port -l
21.14.
Resizing an Online Logical Unit
In most cases, fully resizing an online logical unit
involves two things: resizing the logical unit itself and reflecting
the size change in the corresponding multipath device (if multipathing
is enabled on the system).
To resize the online logical unit, start by modifying the logical unit
size through the array management interface of your storage device.
This procedure differs with each array; as such, consult your storage
array vendor documentation for more information on this.
In order to resize an online file system, the file system must not reside on a partitioned device.
21.14.1. Resizing Fibre Channel Logical Units
After modifying the online logical unit size, re-scan the logical
unit to ensure that the system detects the updated size. To do this for
Fibre Channel logical units, use the following command:
echo 1 > /sys/block/sdX/device/rescan
To re-scan fibre channel logical units on a system that uses
multipathing, execute the aforementioned command for each sd device
(i.e. sd1, sd2,
and so on) that represents a path for the multipathed logical unit. To
determine which devices are paths for a multipath logical unit, use multipath -ll;
then, find the entry that matches the logical unit being resized. It is
advisable that you refer to the WWID of each entry to make it easier to
find which one matches the logical unit being resized.
21.14.2. Resizing an iSCSI Logical Unit
After modifying the online logical unit size, re-scan the logical
unit to ensure that the system detects the updated size. To do this for
iSCSI devices, use the following command:
iscsiadm -m node --targetname target_name -R[]
Replace target_name
You can also re-scan iSCSI logical units using the following command:
iscsiadm -m node -R -I interface
Replace interfaceiface0). This command performs two operations:
21.14.3. Updating the Size of Your Multipath Device
If multipathing is enabled on your system, you will also need to
reflect the change in logical unit size to the logical unit's
corresponding multipath device (after resizing the logical unit). For Red Hat Enterprise Linux 5.3 (or later), you can do this through multipathd. To do so, first ensure that multipathd is running using service multipathd status. Once you've verified that multipathd is operational, run the following command:
multipathd -k"resize map multipath_device"
The multipath_device/dev/mapper. Depending on how multipathing is set up on your system, multipath_device
mpathX, where Xmpath0)
a WWID; for example, 3600508b400105e210000900000490000
To determine which multipath entry corresponds to your resized logical unit, run multipath -ll.
This displays a list of all existing multipath entries in the system,
along with the major and minor numbers of their corresponding devices.
Do not use multipathd -k"resize map multipath_device" if there are any commands queued to multipath_deviceno_path_retry parameter (in /etc/multipath.conf) is set to "queue", and there are no active paths to the device.
If your system is using Red Hat Enterprise Linux 5.0-5.2, you will need to perform the following procedure to instruct the multipathd daemon to recognize (and adjust to) the changes you made to the resized logical unit:
Procedure 21.4. Resizing the Corresponding Multipath Device (Required for Red Hat Enterprise Linux 5.0 - 5.2)
Dump the device mapper table for the multipathed device using:
dmsetup table multipath_device
Save the dumped device mapper table as table_name
Examine the device mapper table. Note that the first two numbers in
each line correspond to the start and end sectors of the disk,
respectively.
Suspend the device mapper target:
dmsetup suspend multipath_device
Open the device mapper table you saved earlier (i.e. table_name
Reload the modified device mapper table:
dmsetup reload multipath_device table_name
Resume the device mapper target:
dmsetup resume multipath_device
21.15. Adding/Removing a Logical Unit Through rescan-scsi-bus.sh
The sg3_utils package provides the rescan-scsi-bus.sh
script, which can automatically update the logical unit configuration
of the host as needed (after a device has been added to the system). The
rescan-scsi-bus.sh script can also perform an issue_lip on supported devices. For more information about how to use this script, refer to rescan-scsi-bus.sh --help.
To install the sg3_utils package, run yum install sg3_utils.
Known Issues With rescan-scsi-bus.sh
When using the rescan-scsi-bus.sh script, take note of the following known issues:
In order for rescan-scsi-bus.sh to work properly, LUN0 must be the first mapped logical unit. The rescan-scsi-bus.sh can only detect the first mapped logical unit if it is LUN0. The rescan-scsi-bus.sh will not be able to scan any other logical unit unless it detects the first mapped logical unit even if you use the --nooptscan option.
A race condition requires that rescan-scsi-bus.sh be run twice if logical units are mapped for the first time. During the first scan, rescan-scsi-bus.sh only adds LUN0; all other logical units are added in the second scan.
A bug in the rescan-scsi-bus.sh script incorrectly executes the functionality for recognizing a change in logical unit size when the --remove option is used.
The rescan-scsi-bus.sh script does not recognize ISCSI logical unit removals.
21.16. Modifying Link Loss Behavior
This section describes how to modify the link loss behavior of devices that use either fibre channel or iSCSI protocols.
If a driver implements the Transport dev_loss_tmo
callback, access attempts to a device through a link will be blocked
when a transport problem is detected. To verify if a device is blocked,
run the following command:
cat /sys/block/device/device/state
This command will return blocked if the device is blocked. If the device is operating normally, this command will return running.
Procedure 21.5. Determining The State of a Remote Port
To determine the state of a remote port, run the following command:
cat /sys/class/fc_remote_port/rport-H:B:R/port_state
This command will return Blocked
when the remote port (along with devices accessed through it) are
blocked. If the remote port is operating normally, the command will
return Online.
If the problem is not resolved within dev_loss_tmo
seconds, the rport and devices will be unblocked and all I/O running on
that device (along with any new I/O sent to that device) will be
failed.
Procedure 21.6. Changing dev_loss_tmo
To change the dev_loss_tmo value, echo in the desired value to the file. For example, to set dev_loss_tmo to 30 seconds, run:
echo 30 > /sys/class/fc_remote_port/rport-H:B:R/dev_loss_tmo
When a device is blocked, the fibre channel class will leave the device as is; i.e. /dev/sdx will remain /dev/sdx. This is because the dev_loss_tmo
expired. If the link problem is fixed at a later time, operations will
continue using the same SCSI device and device node name.
Fibre Channel: remove_on_dev_loss
If you prefer that devices are removed at the SCSI layer when links are marked bad (i.e. expired after dev_loss_tmo seconds), you can use the scsi_transport_fc module parameter remove_on_dev_loss. When a device is removed at the SCSI layer while remove_on_dev_loss is in effect, the device will be added back once all transport problems are corrected.
The use of remove_on_dev_loss is not
recommended, as removing a device at the SCSI layer does not
automatically unmount any file systems from that device. When file
systems from a removed device are left mounted, the device may not be
properly removed from multipath or RAID devices.
Further problems may arise from this if the upper layers are not
hotplug-aware. This is because the upper layers may still be holding
references to the state of the device before it was originally removed.
This can cause unexpected behavior when the device is added again.
21.16.2. iSCSI Settings With dm-multipath
If dm-multipath is implemented, it is
advisable to set iSCSI timers to immediately defer commands to the
multipath layer. To configure this, nest the following line under device { in /etc/multipath.conf:
features "1 queue_if_no_path"
This ensures that I/O errors are retried and queued if all paths are failed in the dm-multipath layer.
You may need to adjust iSCSI timers further to better monitor your SAN
for problems. Available iSCSI timers you can configure are NOP-Out Interval/Timeouts and replacement_timeout, which are discussed in the following sections.
21.16.2.1. NOP-Out Interval/Timeout
To help monitor problems the SAN, the iSCSI layer sends a NOP-Out
request to each target. If a NOP-Out request times out, the iSCSI layer
responds by failing any running commands and instructing the SCSI layer
to requeue those commands when possible.
When dm-multipath is being used, the SCSI
layer will fail those running commands and defer them to the multipath
layer. The multipath layer then retries those commands on another path.
If dm-multipath is not being used, those commands are retried five times before failing altogether.
Intervals between NOP-Out requests are 10 seconds by default. To adjust this, open /etc/iscsi/iscsid.conf and edit the following line:
node.conn[0].timeo.noop_out_interval = [interval value]
Once set, the iSCSI layer will send a NOP-Out request to each target every [interval value] seconds.
By default, NOP-Out requests time out in 10 seconds[]. To adjust this, open /etc/iscsi/iscsid.conf and edit the following line:
node.conn[0].timeo.noop_out_timeout = [timeout value]
This sets the iSCSI layer to timeout a NOP-Out request after [timeout value] seconds.
If the SCSI Error Handler is running, running commands on a path will
not be failed immediately when a NOP-Out request times out on that path.
Instead, those commands will be failed
after replacement_timeout seconds. For more information about
replacement_timeout, refer to
Section 21.16.2.2, “replacement_timeout”.
To verify if the SCSI Error Handler is running, run:
iscsiadm -m session -P 3
21.16.2.2. replacement_timeout
replacement_timeout controls how long the
iSCSI layer should wait for a timed-out path/session to reestablish
itself before failing any commands on it. The default replacement_timeout value is 120 seconds.
To adjust replacement_timeout, open /etc/iscsi/iscsid.conf and edit the following line:
node.session.timeo.replacement_timeout = [replacement_timeout]
The
1 queue_if_no_path option in
/etc/multipath.conf sets iSCSI timers to immediately defer commands to the multipath layer (refer to
Section 21.16.2, “iSCSI Settings With dm-multipath”). This setting prevents I/O errors from propagating to the application; because of this, you can set
replacement_timeout to 15-20 seconds.
By configuring a lower replacement_timeout,
I/O is quickly sent to a new path and executed (in the event of a
NOP-Out timeout) while the iSCSI layer attempts to re-establish the
failed path/session. If all paths time out, then the multipath and
device mapper layer will internally queue I/O based on the settings in /etc/multipath.conf instead of /etc/iscsi/iscsid.conf.
Whether your considerations are failover speed or security, the recommended value for replacement_timeout
will depend on other factors. These factors include the network,
target, and system workload. As such, it is recommended that you
thoroughly test any new configurations to replacements_timeout before applying it to a mission-critical system.
When accessing the root partition directly through a iSCSI disk, the
iSCSI timers should be set so that iSCSI layer has several chances to
try to reestablish a path/session. In addition, commands should not be
quickly re-queued to the SCSI layer. This is the opposite of what should
be done when dm-multipath is implemented.
To start with, NOP-Outs should be disabled. You can do this by setting
both NOP-Out interval and timeout to zero. To set this, open /etc/iscsi/iscsid.conf and edit as follows:
node.conn[0].timeo.noop_out_interval = 0
node.conn[0].timeo.noop_out_timeout = 0
In line with this, replacement_timeout
should be set to a high number. This will instruct the system to wait a
long time for a path/session to reestablish itself. To adjust replacement_timeout, open /etc/iscsi/iscsid.conf and edit the following line:
node.session.timeo.replacement_timeout = replacement_timeout
After configuring
/etc/iscsi/iscsid.conf, you must perform a re-discovery of the affected storage. This will allow the system to load and use any new values in
/etc/iscsi/iscsid.conf. For more information on how to discover iSCSI devices, refer to
Section 21.12, “
Scanning iSCSI Interconnects”.
Configuring Timeouts for a Specific Session
You can also configure timeouts for a specific session and make them non-persistent (instead of using /etc/iscsi/iscsid.conf). To do so, run the following command (replace the variables accordingly):
iscsiadm -m node -T target_name -p target_IP:port -o update -n node.session.timeo.replacement_timeout -v $timeout_value
The configuration described here is recommended for iSCSI sessions
involving root partition access. For iSCSI sessions involving access to
other types of storage (namely, in systems that use
dm-multipath), refer to
Section 21.16.2, “iSCSI Settings With dm-multipath”.
21.17. Controlling the SCSI Command Timer and Device Status
The Linux SCSI layer sets a timer on each command. When this timer expires, the SCSI layer will quiesce the host bus adapter
(HBA) and wait for all outstanding commands to either time out or
complete. Afterwards, the SCSI layer will activate the driver's error
handler.
When the error handler is triggered, it attempts the following operations in order (until one successfully executes):
Abort the command.
Reset the device.
Reset the bus.
Reset the host.
If all of these operations fail, the device will be set to the offline state. When this occurs, all I/O to that device will be failed, until the problem is corrected and the user sets the device to running.
The process is different, however, if a device uses the fibre channel protocol and the rport is blocked. In such cases, the drivers wait for several seconds for the rport
to become online again before activating the error handler. This
prevents devices from becoming offline due to temporary transport
problems.
To display the state of a device, use:
cat /sys/block/device-name/device/state
To set a device to running state, use:
echo running > /sys/block/device-name/device/state
To control the command timer, you can write to /sys/block/device-name/device/timeout. To do so, run:
echo value /sys/block/device-name/device/timeout
Here, value
This section provides solution to common problems users experience during online storage reconfiguration.
- Logical unit removal status is not reflected on the host.
When a logical unit is deleted on a configured filer, the change is not reflected on the host. In such cases, lvm commands will hang indefinitely when dm-multipath is used, as the logical unit has now become stale.
To work around this, perform the following procedure:
Procedure 21.7. Working Around Stale Logical Units
Determine which mpath link entries in /etc/lvm/cache/.cache are specific to the stale logical unit. To do this, run the following command:
ls -l /dev/mpath | grep stale-logical-unit
For example, if stale-logical-unit
lrwxrwxrwx 1 root root 7 Aug  2 10:33 /3600d0230003414f30000203a7bc41a00 -> ../dm-4
lrwxrwxrwx 1 root root 7 Aug  2 10:33 /3600d0230003414f30000203a7bc41a00p1 -> ../dm-5
This means that 3600d0230003414f30000203a7bc41a00 is mapped to two mpath links: dm-4 and dm-5.
Next, open /etc/lvm/cache/.cache. Delete all lines containing stale-logical-unitmpath links that stale-logical-unit
Using the same example in the previous step, the lines you need to delete are:
/dev/dm-4
/dev/dm-5
/dev/mapper/3600d0230003414f30000203a7bc41a00
/dev/mapper/3600d0230003414f30000203a7bc41a00p1
/dev/mpath/3600d0230003414f30000203a7bc41a00
/dev/mpath/3600d0230003414f30000203a7bc41a00p1